An Inexpensive Approach to Making Video Tutorials
Short, concise video tutorials can be an effective way to explain theory or demonstrate a concept. Students can watch the video as many times as they need and the video can serve as a refresher material for students prior to evaluations. The cost to produce a video has diminished with the arrival of a number of free software tools and services that are provided for free to users. What follows is a proposition for a short workflow to create video tutorials using open source software and free services.
Getting Ready: The Equipment, Software Tools and Services
Before you get started, there are a couple of pieces of equipment that you might find handy to increase the production quality of your videos:
- A headset with earphones and a microphone for recording your narration (but the embedded microphone on a laptop will also do the trick).
- A graphic drawing tablet to be used for your on-screen notation, such as a Wacom Intuos Draw (you can also just use your mouse, but you may find precision drawing more difficult)
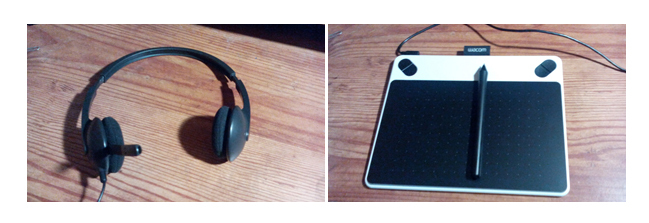
The recommended equipment: a USB Headset and graphic tablet.
If you don’t have a headset and graphic tablet, you may be able to borrow these from your college’s audio/visual service. Should you need to purchase this equipment, the USB headsets start at around $30 and a basic graphic tablet runs around $100.
The following free and open source software is used as part of the workflow for producing video tutorials in this article:
- OpenOffice productivity suite for creating your script before recording your video
- Krita digital drawing software for its versatile drawing and annotating capability (used in tandem with your graphic tablet)
- OBS Studio screen recording software used to capture your tutorial in a video format
You will also need a place to post your videos:
- A YouTube account (already available to you if you have a gmail or Google Drive account)
With the equipment, software and services above, you have all that you need to produce video tutorials. The very popular Khan Academy video series includes videos that could easily be replicated with this type of setup.
The Workflow
- Storyboard and create narration notes with LibreOffice Impress
- Record the tutorial with OBS Studio while working with Krita and your graphic tablet
- Upload to YouTube, edit video and set options
1. Storyboard and create narration notes with LibreOffice Impress
OpenOffice is a free and open source office productivity suite that can be used as an alternative to other paid office productivity suites. OpenOffice includes slide presentation software known as Impress. Many instructional designers use presentation software to create storyboards, which are a mockup of what is to appear on screen along with notes on talking points. These storyboards will help you to organize your thoughts in a coherent manner and remember all of your crucial elements of theory. This will help minimize the inevitable “ums and ahs” and pregnant pauses that plague many a video tutorial!
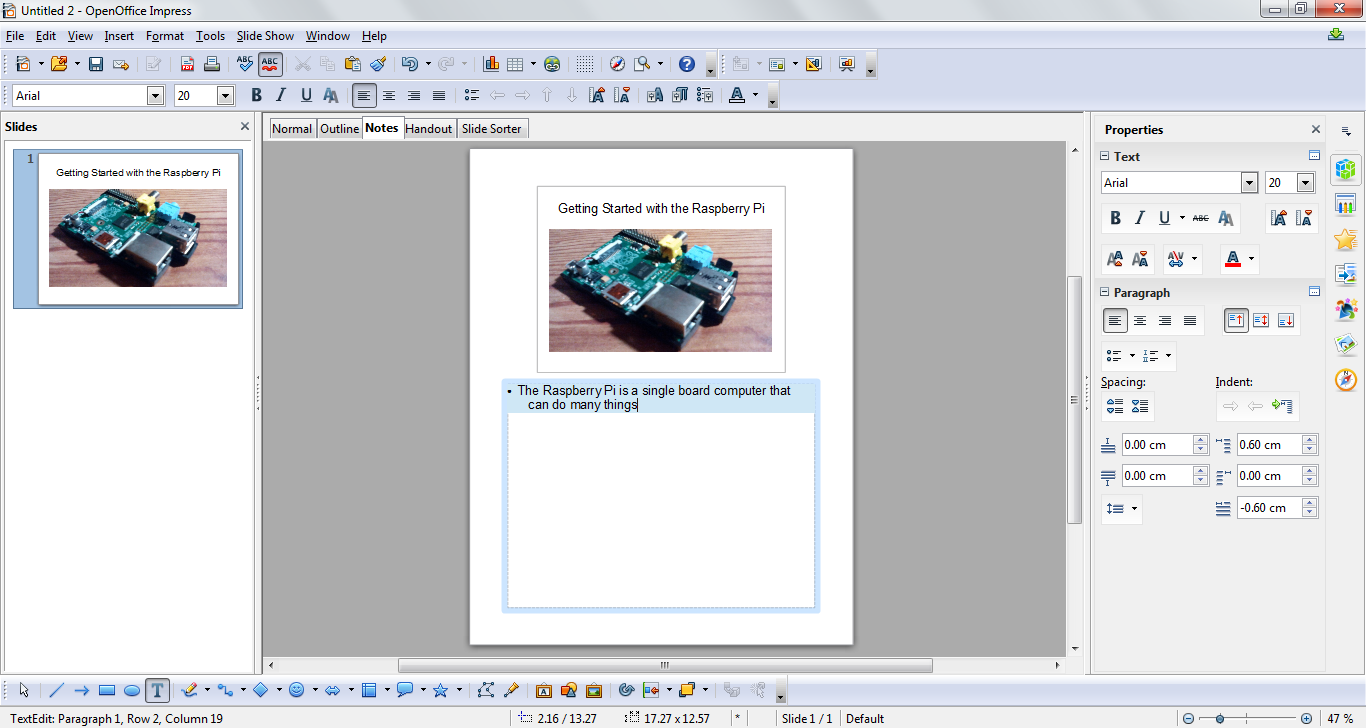
OpenOffice Impress in the ‘Notes’ view. The slide content appears at the top and narration notes appear in the lower half of the document.
Once you are done creating your script, print it out and keep it handy for the next step.
2. Record the tutorial with OBS Studio while working with Krita and your graphic tablet
With your planning for the video now complete, you can open the Krita Drawing software and prepare your canvas. If it is your first time using Krita, you can visit YouTube for a quick introduction for beginners. For the purposes of demonstration in this article, I have imported a picture of a single-board computer, which I took with my cell phone. The video I produce will introduce the computer and some of its parts.
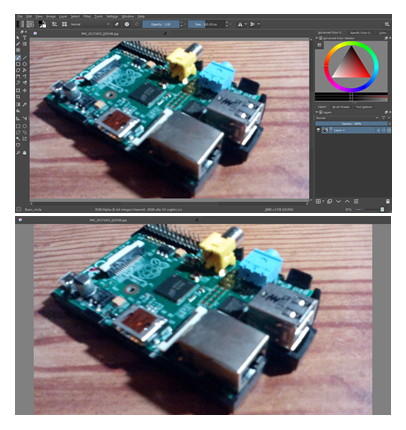
The Krita interface showing the picture that will be used for the video tutorial. The picture on the right shows Krita in ‘Canvas mode,’ which is the video we will want to use for the tutorial.
Once the picture is open and you have chosen a colour for your drawing pen in Krita, press the Tab key to open ‘Canvas mode,’ which shows only the picture that you will be annotating while hiding the Krita interface. You can press the Tab key again in Krita to restore the full interface. It’s time to put on your headset with microphone, as you will soon begin recording your video!
Now open the OBS Studio software and prepare it to record. If this is your first time using OBS Studio, you can visit YouTube for a brief video on how to record videos with OBS Studio. In the video, the presenter uses a webcam in addition to capturing his screen, but you are not obliged to do so.
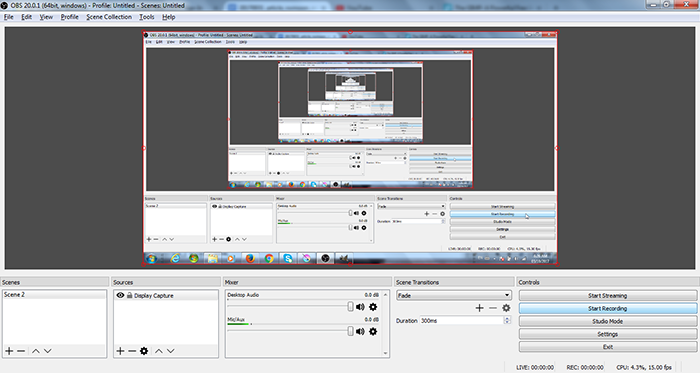
The OBS Studio User Interface with options configured to create a recording of whatever displays on the computer monitor.
Here are the settings to prepare in OBS Studio before you start recording:
- Press the plus sign under ‘Sources.’
- Pick ‘Display Capture.’
- Press ‘OK.’
Now it is time to begin recording your tutorial.
- Press ‘Start Recording’
- Switch to your ‘Krita’ window and start narrating and drawing
- Switch back to your OBS Studio window and press ‘Stop Recording’
If you have not changed the video output settings in OBS, your recorded video will appear in your Videos folder in Windows. The file is created in .flv format, which is an acceptable format for YouTube.
3. Upload to YouTube, edit video and set options
If you have a Gmail or Google Drive Account, you can log into your account and then go to YouTube.

The video upload icon appears once you have logged in to your Google account and navigated to YouTube.
Click on the ‘Upload’ icon in YouTube. You may be asked to accept a Terms of Use agreement. You will then be able to select the video tutorial you recorded on your computer to upload to YouTube. You will have plenty of options for editing and sharing your video. If you are using YouTube for the first time to host your videos, there are great tutorials on how to upload and how to edit your video. The latter video will show you how to crop out parts of your video. This information will help you to cut out the OBS Studio interface at the beginning and end of your video when you were starting and stopping your recording.
Using the process described above, I produced the following video:
A video tutorial on the parts of the Raspberry Pi (Rev B) single-board computer.
There’s Always Room for Improvement
Once you have produced and uploaded your first video, there is cause for celebration! You have opened up a whole new world of possibilities. One of the great things about learning to produce tutorials is that there is always some little way to improve your process or to add a little something extra to your videos to increase their quality.
Perhaps you want to add a title screen to your video. Might I suggest using the GIMP open source image editing software?
Are you a Moodle user? Once you create a video, you may want to embed it directly into one of your Moodle courses. To learn more about how to do this, have a look at this tutorial on YouTube.
Congratulations on taking your first steps towards creating video tutorials. For our more experienced readers, we would love to hear any tips or inspiration for teachers that are just starting out. Feel free to post your comment below!
