Using WordPress for your Websites and Blogs
You can put the tips from this article into practice by creating a blog in a free account on Profweb’s Web Space.
This article will help you learn to use WordPress, be it to create a blog or a website. Several examples of using the tool in an academic context will be mentioned as sources of inspiration. WordPress flexibility can be problematic particularly for new users. A complete description of the interface as well as video capsules will give you the basics to create a web site.
Table of Contents
- Defining WordPress
- General Uses of WordPress
- Educational Uses of WordPress
- What are the Basic Requirements for WordPress?
- Managing Your Blog
- Commonly Used Terms
- Explaining the Administration Interface
- Frequently Asked Questions
Defining WordPress
WordPress is a content management system (CMS). A CMS allows you to manage the content of a web site using an interface so you do not have to touch the code behind your website. WordPress is mostly used as a blog engine, but it is capable of handling any kind of website.
A CMS splits the content and the container:
- The Content: text, images, etc.
- The Container: the design (themes and templates)
The term blog is derived from the term Web-log (or “web log”). A blog is a website and usually takes the form of a diary comprising a series of articles (consisting of text, images, videos and hyperlinks) presented in reverse chronological order (i.e. most recent to oldest ).
General Uses of WordPress
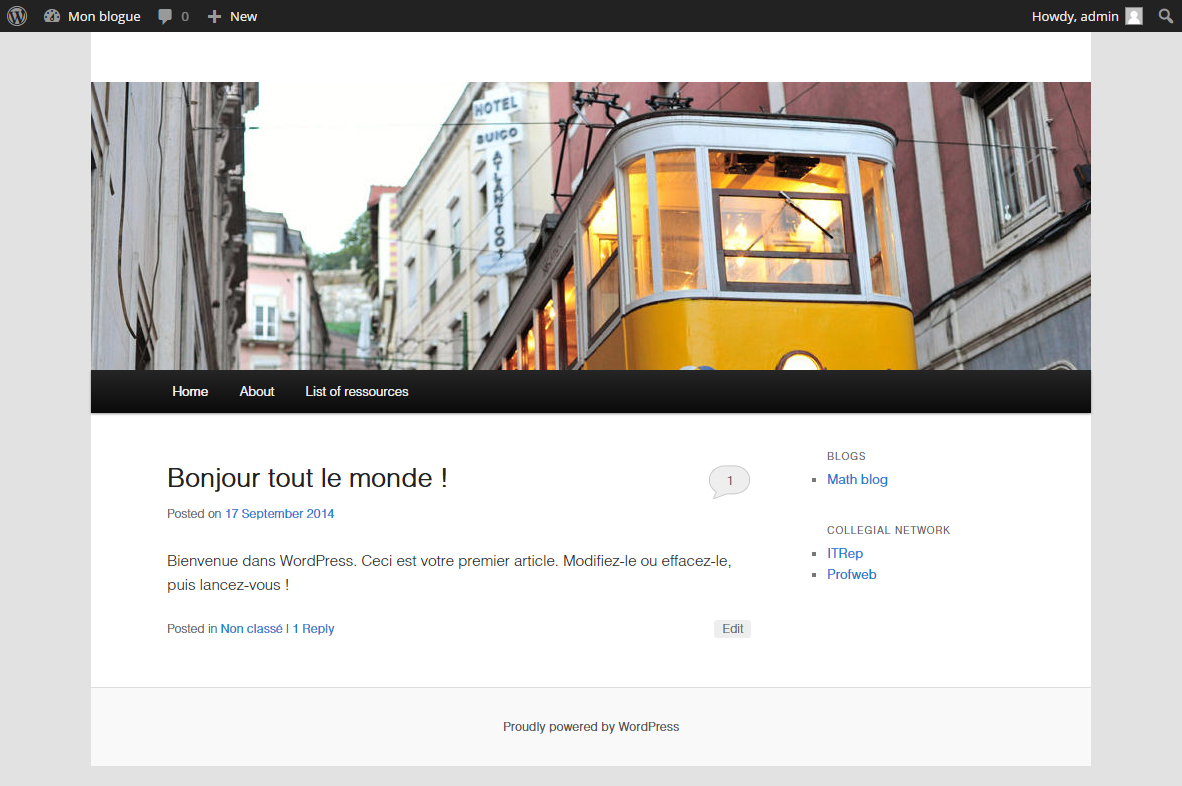
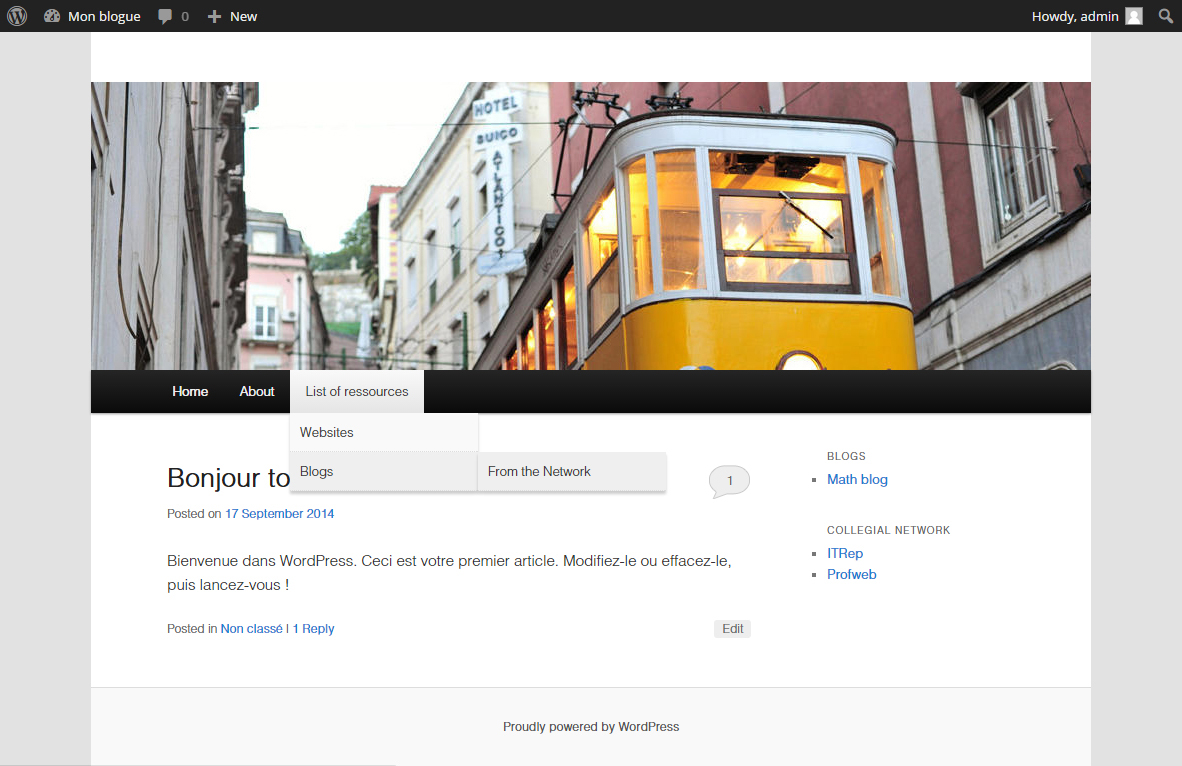
WordPress allows the user to create a website or a blog. You can create both simultaneously. There can be simple pages, accessible via the main menu, as well as a blog section where you can post articles.
Educational Uses of WordPress
As mentioned by Charles-Antoine Bertrand in his Featured Report on the subject mentioned above, the blog offers the possibility of establishing “a large-scale discussion by publishing our thoughts and accomplishments in the public sphere.” A website also allows you to share multimedia content, texts, papers, videos and a host of other content types, in chronological order.
Pedagogical Support
WordPress is often used as a support in the context of the flipped classroom. Joy Blake in the Profweb story Blog to Better English mentions the easy learning curve to get the resource in operation. A site created with WordPress allows the moderator to place subject-related content easily thanks to its visual interface promoting the creation of resources for the flipped classroom.
Sharing
It is a platform to share knowledge and create a dialogue with an audience. Stephen Cohen recounts his experiences in his real-life story The Engineer’s Pulse.
Motivation and Engagement
A website or blog can also be used in order to motivate students and encourage their level of commitment vis-à-vis a course. Derek Heatherington used a blog to enable his students to work in groups to create active learning exercises about economic issues in the story Actively Blogging. He was eager to use a blog as a tool to help students constructively construct knowledge.
Portfolio
A blog can serve as a portfolio for students or teachers. WordPress allows you to create a network of blogs that are run by an administrator user. As in the example of teachers Cégep Limoilou in the course “Explorer” told a real-life story from our French service Blogs to track individual students as a springboard for projects of self-discovery (in french). Here, the use of individual blogs has allowed teachers to follow the students explorations, from the start to the finish.
What are the Basic Requirements for WordPress?
You can create a blog for free from the site WordPress.com. WordPress.com is a commercial site where you can host a WordPress site for free but with certain restrictions.You must pay an annual fee to remove these restrictions. The no-cost package includes:
- A free blog
- 3 GB of space for your files
- Advertisements present on your site
- Custom design not available
- Premium theme not available
If you want more freedom you need to host and install WordPress using a web hosting service or with a free web service such as the Web Space offered by Profweb. In the case of an independent host, you must meet certain server requirements as presented on the site WordPress.org. Many hosts offer one-click installation of WordPress.
Managing Your Blog
If you want to take advantage of the free web hosting offered by Profweb, check My Web Space for the procedure to follow. To host your website with another party, see the section on hosting at WordPress.org.
Connection to the Administration Interface
Once WordPress is installed, you can access the administration interface of your website through an address generally formatted like this: www.mywebsite.com/wp-admin.
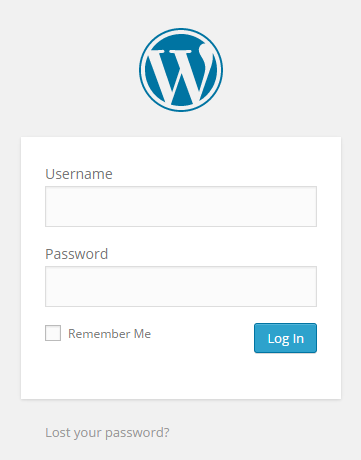
The Login Window to your Site
Once connected, you can access the administration interface.
Commonly Used Terms
First, here is a list of some commonly used technical terms that can be confusing:
- Models and Templates
- WordPress uses templates to dynamically generate pages and change structure and appearance. Each page can have a different template.
- Themes
- A theme allows you to change the appearance and layout of your site. You can install a theme automatically or manually using an FTP software such as Filezila (File Transfer Protocol).
- Plugins
- Extensions allow you to add functionality to your site. There are many available on the WordPress site developed by other users and developers.
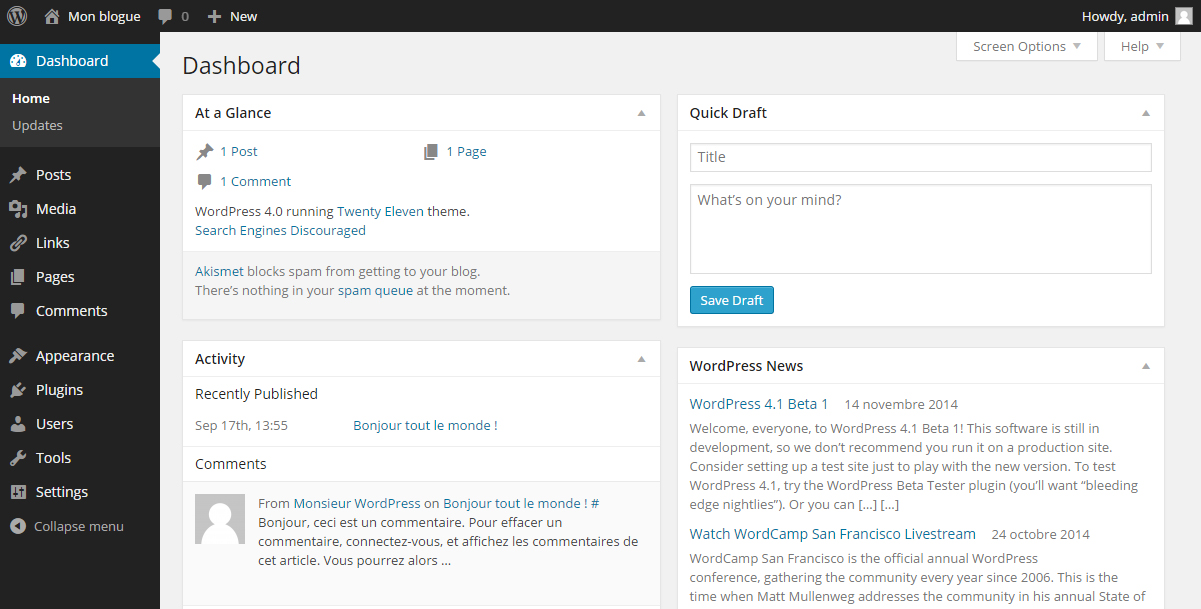
Explaining the Administration Interface
The administration interface allows WordPress to update the configuration of your site as well as content. As you may have noticed there are several menu sections that can confuse you if you are not familiar with this kind of interface. The different sections of the WordPress interface are found in two menus:
- The horizontal menu at the top allows quick access to commonly used functions of WordPress (updates, access the website, etc.).
- The left sidebar is the main menu and provides access to all WordPress administration panels (add an article, edit a page, manage comments, change the theme, etc.).
Horizontal Top Menu
The top bar has six sections:
- The WordPress logo (W) provides access to resources, documentation and the WordPress support forum.
- The title of your site allows you to view the online version of your site while remaining within the administration interface.
- The Update icon (two end-to-end arrows) provides access to the update section of WordPress as well as extensions installed on your site. It is important to always update the version of WordPress for reasons of security and stability.
- The Comment icon (a cartoon bubble) allows you to manage feedback from your visitors.
- The icon “+ New” enables the addition of new content (article, file, link, page, user) to your site. Move the mouse over the button to display the various options. The default is the interface for creating an article that will be selected.
- The last section allows you to edit your profile (including your password) and log out from the administration interface.
Left Sidebar
The main menu includes the features most important to you and it is divided into two parts. The first part is related to the content of your site, while the second is related to the container (themes, templates, extensions, etc.).
All the sections of the first part of the expanded sidebar
Dashboard
This section is divided into two sub-sections:
- Home: This is the home page of the administration interface of WordPress. You will find an overview of the content of your site, such as: recent comments, drafts and some statistics (number of items, number of pages, number of comments, etc.).
- Updates: This is where you can not only update the version of WordPress but also extensions and themes installed on your site. For peace of mind and to avoid problems with security or stability, update regularly!
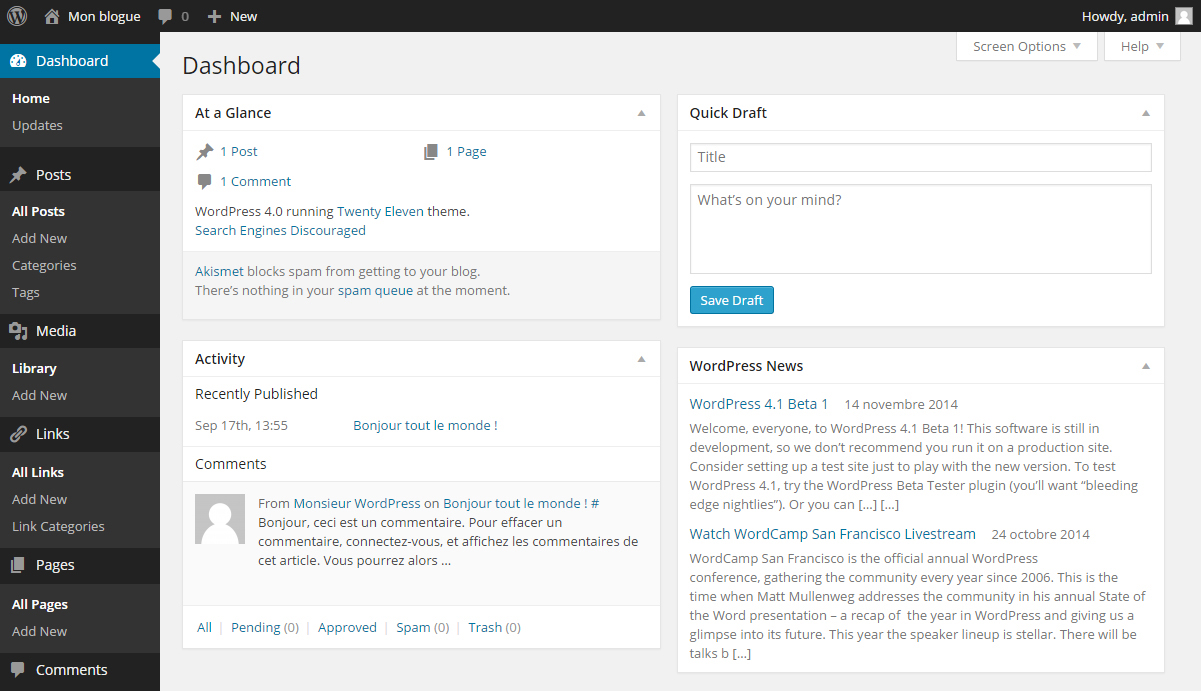
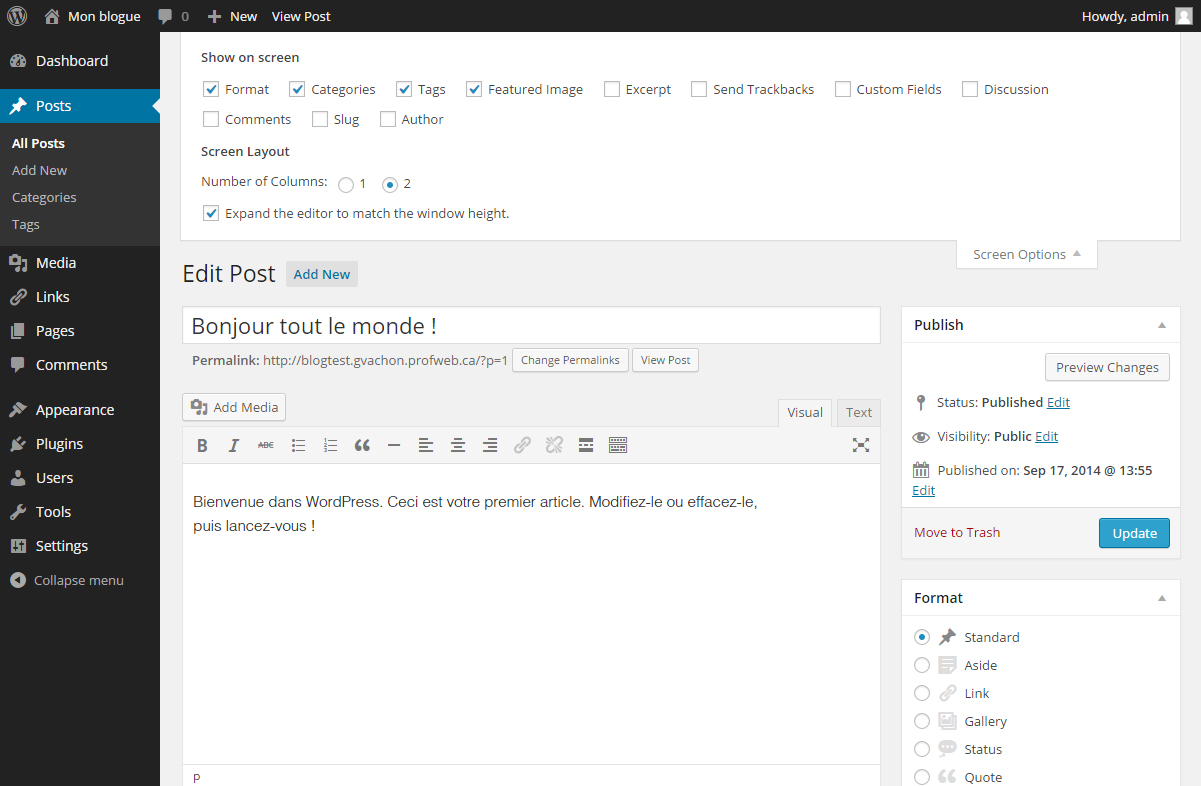
Posts
Posts are normally blog posts. They are displayed, depending on the theme used, by date of publication on the website homepage. Posts can be used as a journal, to share news or discoveries related to the subject or topic of the blog. Although posts generally have a short lifespan; visitors do not normally expect year-old content to be up to date. It all depends on the nature of your blog!
In a post, it is possible to change some settings:
- Control its status (published, draft or replay).
- Control visibility: public, private (only those who know the address of the page have access) or password-protect (visitors have access to the page but must enter a password to view its content).
- Select the date of publication of this post. You can prepare a post to be published later or retroactively.
- Select the format of the article. The format refers to how your theme should display a particular item. For example, you might want to use the default format for displaying title and content, or “Quote” format to post an inspiring thought. Read the Codex documentation for a description of each format. It is possible that your theme does not support some of the 10 possible formats.
- Add a “Featured Image”. This image will replace the default image in the header of your site, but only for this particular post.
- Define at least one category and multiple tags.
The Posts section is divided into four sub-sections:
- All Posts: here we find the list of posts created, published, deleted (trash) and your drafts.
- Add New: Lets you create a new post.
There are other features available as well. By checking them, they will appear further down the page.
- Categories: WordPress is used to classify items into categories. It is in this section that you manage them. It is advisable to consider from the outset how you want to categorize your articles. You must associate all items with at least one keyword. This allows all the articles on the same subject to be linked. The categories are usually displayed at the bottom of each article.
- Tags: In addition to the categories (which are broader) you can associate keywords in your articles. They often designate more specific elements discussed in the text. For a blog about mathematics, the following keywords could be found: laboratory, demonstrations, exercises, etc.
Media
Here is a list of all media (images, videos, pdfs, etc.) that you have uploaded to your site. For example, if you post an image in an article, it will be listed in the media library.
The Media section is divided into two sub-sections:
- Library: here we find the list of all media (images, videos, pdfs, etc.) that you have uploaded to your site.
- Add New: allows you to download new media. Note that the maximum file allowed to be posted is 64mb. If you want to upload a larger file you need to use an FTP software and then refer to the address of the file.
Links
This section is not used by default in versions 3.5 and up of WordPress. It helps to add a list of links to your site’s page. To enable this option, you will need to add in “Appearance > Widgets” by dragging and dropping the “Links” item into the “Main Sidebar” box.
Example of links grouped by category
The Link This section is divided into three sub-sections:
- All links: list of all the links. This list does not represent the links that appear in your articles or your pages.
- Add New: to add a link.
- Link Categories: it is possible to create collections of links. This is where you can create a new category.
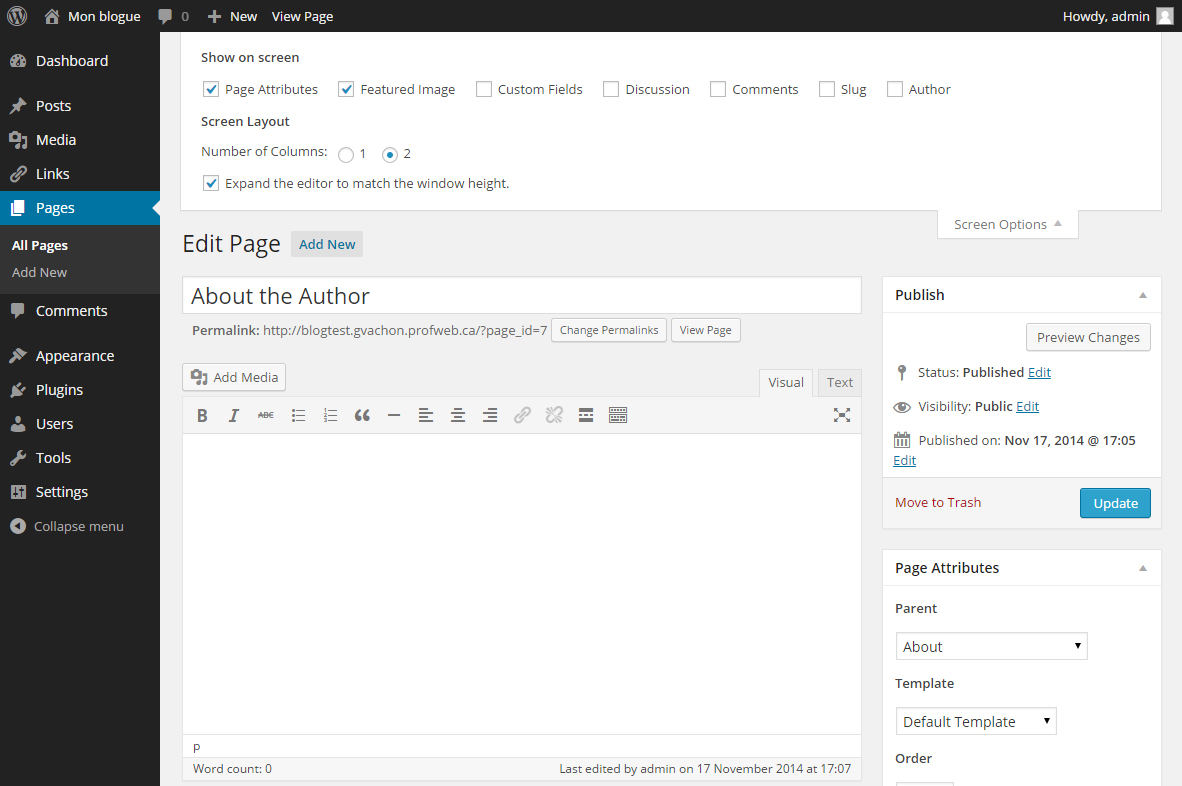
Pages
The pages, contrary to posts typically contain static content. They do not follow a chronological order, but are rather organized in a tree structure. This means that there will be parent and child pages. These pages are accessible from the main menu. You can arrange your pageslogically for your visitors to instinctively find the content they seek.
Child-pages are found under the parent pages. Here there are three levels.
In a page, it is possible to change some settings:
- Control its status (published, draft or replay).
- Control visibility: public, private (only those who know the address of the page have access) or password-protect (visitors have access to the page but must enter a password to view its content).
- Select the date of publication of this page. You can prepare a page to be published later or retroactively.
- Choose which template the page will use. This will affect its visual appearance and its content organization. This option isn’t always available; it depends on the theme used.
- Select the format of the article. The format refers to how your theme should display a particular item. For example, you might want to use the default format for displaying title and content, or “Quote” format to post an inspiring thought. Read the Codex documentation for a description of each format. It is possible that your theme does not support some of the 10 possible formats.
- Select a parent page, if applicable. The default value is “(no parent)” will place this page in the first menu level.
- You can set the order of this page in the menu. By default, all pages at the same level in you menu will be ordered alphabetically. Use number starting from zero.
- Add a “Featured Image”. This image will replace the default image in the header of your site, but only for this particular post.
- Define one or more categories and multiple tags.
As with the Posts, there are additional functionalities available.
The Pages section is divided into two sub-sections:
- All pages: here we find the list of pages created, published, deleted (trash) and your drafts.
- Add New: Lets you create a new page.
Comments
This section lists all the comments left by your readers. You can: approve, disapprove, delete or mark them as spam. You can configure how readers can leave comments in the “Settings > Discussion” section.
Appearances
This section allows you to manage everything that concerns the appearance and organization of all parts of your site.
The Appearances section is divided into seven sub-sections (the number may vary depending on the theme used):
- Themes: Themes are used to change the appearance of a WordPress site.You can download many free themes. One option is to use the tab “Install Themes” in this section; they will be installed automatically, or upload them to WordPress.org/themes and then install them manually via FTP. (video clip)
- Customize: available with version 4.0 and up of WordPress, it lets you change the visual and see a preview of those changes before saving them. You can choose the fonts, colors, layout, etc.
- Widgets: The widgets work as modules that add new features to your site. Depending on the theme used, you can add those to different sections in your site by dragging and dropping them in the desired area. See the “Widgets” section to add, delete or disable them.
- Menus: This page allows you to manage and customize the menu of your website. If you do not want to use the options “Parent” and “Order” on each page, you can manage your menu from this page.
- Theme Options: According to the theme used, this option might not be available. It allows you to change certain options like link color, layout, etc. The options might differ depending on the theme used.
- Header: According to the theme used, this option might not be available. It allows you to manage the images in the header, text color, etc. The options might differ depending on the theme used.
- Background: According to the theme used this option might not be available. It allows you to change the color or image used for the background of your site. The options might differ depending on the theme used.
- Editor: This section is for advanced users only!It allows you to edit files of a theme. You must have knowledge of CSS, JavaScript and PHP languages. Read the article in the WordPress Codex on Theme Development to learn the basics about creating themes and check this infographic about theme anatomy.
Tutorial: How to modify your WordPress Theme
Widgets
This is where you can add, enable, disable, update or remove widgets from your site. It is also possible to edit and configure widgets, but this option is only for advancedusers! Before installing a widget found on the web, make sure the source is reliable.
Users
Here is a list of all current users of your site. Each user has one of five predefined roles as assigned by the Site Administrator: Administrator, Editor, Author, Contributor or Subscriber. Users without the Administrator role will have fewer options when they are connected to the administration interface, depending on their role. It is possible to manage your site with one or more colleagues.
Tools
Here you will find different tools that perform automated tasks such as importing or exporting the content of your WordPress site. This section is intended primarily for advanced users!
Settings
This section contains all the settings of WordPress. This is also where you can configure some widgets or theme installed on your site. Some widgets or theme may be displayed within a section following “Settings”.
The Settings section is divided into six sub-sections:
- General: Here you can change the site title, slogan, the email address (for notifications), the time format, etc.
- Writing: you can set some default parameters that will be used when creating a new item, a new page, etc.
- Reading: you can set some parameters including the number of items displayed on the home page or if the home page should display fixed information.
- Discussion: configure everything about the comments.
- Media: you can set some default settings for the media that you download such as the size of images, how the media will be ranked on the server, etc.
- Permalinks: you can select how the URLs of your pages are built.
Frequently Asked Questions
Is my site secure?
By default, your site is public; anyone who knows the address of your site can access it. If you use Profweb Web Space and you want your site to be private, necessitating a user name and password to access, see the section ”Access Types” of My Web Space. If you do not use My Web Space see the section Setting up a private website on the WordPress site.
How do I create a Blog Network?
A WordPress Network is unique installation of WordPress and allows you create and manage a collection of sites that all work individually. The WordPress Network is administered by a super administrator who monitors updates of WordPress and can also share themes and plugins. Since WordPress 3.0, it has been possible to transform any WordPress installation into a WordPress Network.
To create a WordPress Network, follow the instructions in the WordPress Codex on this subject. It is important to save the files and databases of your installation before transforming them into a WordPress. Once your Network is created, watch this video to help you manage it.
A Video Tutorial on Creating a WordPress Network
