Keeping Track of Students During Asynchronous Activities
When we give our students activities to complete asynchronously, especially if they are staggered over many weeks, it is pertinent to have strategies to accompany them and to help them develop their autonomy. In this article, I will suggest some tools to help you do that, including:
One step toward differentiated learning
Distance learning leads many teachers to assign their students more ambitious asynchronous projects, or more varied than traditional “homework” ordinarily given after an in-person class.
Here are 2 examples:
- Rather than keeping yourself to exercises or projects that are a prolongation of the class lectures, many teachers have flipped their approach by creating videos to transmit content and have used the time in synchronous class for active learning activities.
- A teacher could choose to focus their synchronous teaching sessions on a part of the notions of the course, in a continuous progression, but to let the students cover another portion of the notions asynchronously, in parallel (or partially in parallel).
- A fictional case: in an English class, the video conference sessions are centered around the analysis of texts (and accompanied by assignments to complete between the synchronous classes), but the students have to get familiar with the grammar content on their own, in parallel, throughout the semester.
In both cases, it is a way to allow for differentiated learning. We allow each student to assimilate each notion at their own pace.
In the 2nd case even more than in the 1st, the students must demonstrate a high degree of autonomy. But, as for the development of any other ability, we can accompany students in their acquisition of the necessary autonomy.
Technological tools to guide students
To help students navigate the various tasks they have to carry out, provide them with a clear, detailed list. If possible, provide direct links to the tasks on the list. That way, they will not go looking around for the documents or files to open.
Keeping track of your students individually
Moodle’s Checklist: an ideal tool
An interesting tool to help students orient navigate the tasks that they have already completed and those that they still have to carry through is Moodle’s Checklist plugin. Profweb has already published the real-life story of a teacher who uses it [in French]. The checklist can include dates to suggest (or impose) a timeline to students.
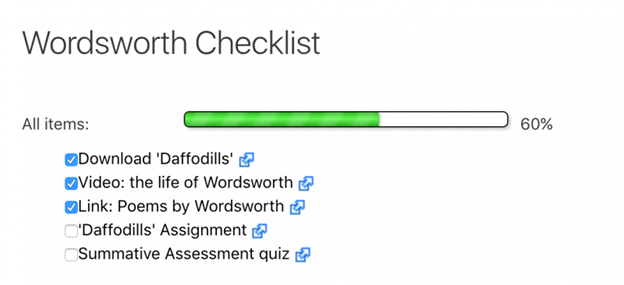
Example of a checklist and progress bar for an assignment about Wordsworth. (Source: MoodleDocs – Wordsworth Checklist)
The checklist and the progress bar that comes with it present a clear picture to the students.
Moreover, for the teacher, the checklist on Moodle allows to assess the progression of an entire group at a glance.
Other options to keep track of your students individually
If you do not use Moodle, Léa still allows you to know, in a less detailed but still very relevant way, which students have consulted the documents that you deposit there for them.
Other tools can also help you check on the progression of your students. For example, with the H5P plugin, you can integrate auto-correcting questions in the videos that you share on Moodle and then see the results of your students. This allows you to know who watched the videos and if the students have understood the main points.
A timeline to guide students
Providing a timeline to your student will help them know where they are. A timeline infographic is very useful for them, however, it does not allow you to keep track of their progress.
An example of a Genially template that could be used by a biology teacher to present a list of tasks to their students. Hyperlinks to different resources can be integrated in the infographic. You will find many timeline templates on Genially by searching for the keyword “timeline”.
Apart from Genially, many tools can be used to create timeline, including:
- PowerPoint
- ThingLink (among others, to add information that appears in an interactive manner on an image of a timeline created with another tool)
- LucidChart (the free version allows you to work on 3 documents)
- Timeline JS
Keeping track of students and allowing them to keep track of their peers
The idea of everyone going at their own page is amazing, with the goal of differentiated learning. However, it can complexify the collaborative activities between students.
If everyone’s progression is visible to everyone else, in addition to allowing students to find peers that go at the same pace as them, it can also foster an emulation effect.
To create spreadsheets that allow each student to indicate where they are in their study, you could use, for example:
- a collaborative whiteboard [in French]
- a shared spreadsheet
- a wiki on Moodle
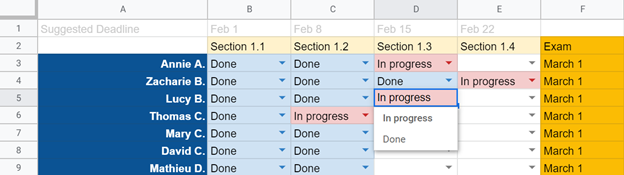
A spreadsheet created on Google Sheets that includes drop-down lists to allow each student to indicate where they are at. This table is liberally inspired by an example that can be found in the article How to Create a Self-Paced Classroom, published on the Cult of Pedagogy website.
Climbing the mountain one step at a time
One of the keys to success, especially for students at the beginning of their collegial journey, is maybe not to throw them, right from the start, into a training path spanning 15 weeks. Establish relatively brief deadlines at the beginning before diving into longer projects. This will prevent your students from accumulating an insurmountable backlog of work to complete.
