Using Macros to Make Correction Faster and Easier on Microsoft Word

This Digital Tool is licensed under a Creative Commons Attribution-Non commercial 4.0 International License.”
When it comes to correcting, the out-of-the-box options offered by Microsoft Word are interesting but extremely time consuming. Highlighting, commenting, or crossing out words all require multiple clicks and keystrokes, which can quickly become tiresome, especially when dealing with longer documents.
Luckily, Word offers a way to streamline this process considerably: macros. Macros allow you to program any intricate series of clicks and keystrokes and assign them to a keybind of your choice. In other words, with macros, you can have a key combination highlight or cross out a selection of text in a colour of your choice, or even insert a pre-written comment. This automation process makes marking considerably easier and saves a lot of time!
Side-by-side comparison of the highlighting process on Word with and without the use of macros.
Additionally, macros are highly customizable. This means that you can give feedback quickly and efficiently while ensuring that your feedback is precise enough for your students to be able to identify and correct their mistakes easily. In the end, everybody wins!
To people unfamiliar with programming, Word’s macro menu might be intimidating. But, do not worry! This tutorial will provide an easy step-by-step guide to set up your own macros and start correcting more quickly and efficiently.
Microsoft Word’s macro creation menu or eldritch text designed to drive you mad? You decide!
Step 1: Creating your macros
The “Macros” menu can be found in the “View” tab of Word’s toolbar. To access the macro creation menu, click on the “Macros” button and then click on “Create”.
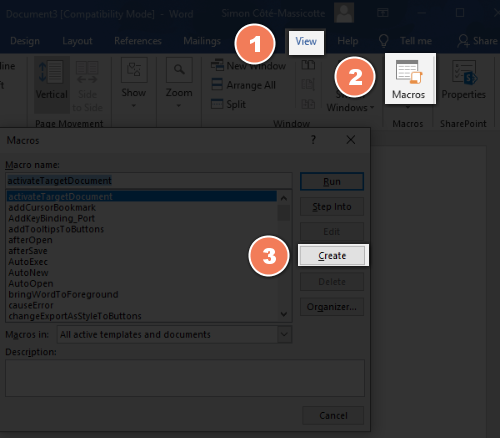
Click on “View”, “Macros”, and then “Create” to access the macro creation menu.
Highlight

The first macro we are going to create will highlight a word or a selection of text. Paired with a simple correction code, those macros will let your students understand their mistakes and save you massive amounts of time.
To create a macro to highlight a selection of text, copy/paste the following code into the macros creation menu:
Selection.range.HighlightColorIndex = wdYellow
End Sub
The word beside “Sub” in the first line is the title of our macro, which we will use to keybind it later. I chose to begin all of my titles with the letter “Z” so I could find all of my custom macros easily at the bottom of the alphabetical list.
On the second line, the “= wdYellow” dictates the colour of our highlighting. The five colours I selected for my correction code were “Yellow”, “BrightGreen”, “Turquoise”, “Pink”, and “Red” as they are the most noticeable default colours that leave black text readable. Copy the code above and replace the colour in the title and after “=wd” to give yourself a variety of highlighting options.
It is also possible to create a macro to remove the highlighting on a word, which can be helpful when you make a mistake. To do so, copy/paste the following code into the macro creation tool:
Selection.range.HighlightColorIndex = wdNoHighlight
End Sub

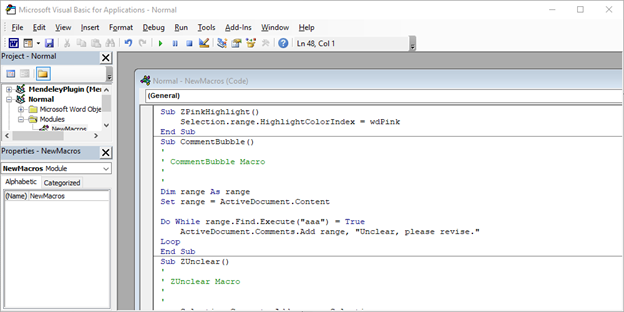
When you are done with the previous step, your highlighting macros should look like this.
Insert pre-written comments
It is also possible to use macros to insert pre-written comments, which is helpful for common syntax or structure mistakes, for example. Here is a macro I use to identify unclear statements or passages:
‘
‘ ZUnclear Macro
‘
‘
Selection.Comments.Add range:=Selection.range
Selection.TypeText Text:=”Unclear, please revise.”
ActiveWindow.ActivePane.Close
End Sub
This macro comments “Unclear, please revise.” on a selected portion of text. To personalize your comment, change the text between the quotation marks on the line “Selection.TypeText Text:=”. Some comment macros I currently use are: “Unclear”, “Sentence fragment”, “Word missing”, “Word order”, “New sentence”, and “New paragraph”. Those six comments cover about 90% of the syntax and structure mistakes I encounter regularly, leaving me with plenty of mental space and patience to type out more detailed comments when they are required.
Cross out text
The last macro we want to create will cross out a portion of text and change the font colour.
‘
‘
‘ ZExtraWord Macro
‘
‘
Selection.Font.Color = RGB(255, 0, 0)
Selection.Font.StrikeThrough = True
End Sub
This specific macro will cross out your selection and turn it red. I use it to identify words that need to be removed for a sentence to be syntactically sound. You can change the font colour by changing the RGB values in the code. For example, (0, 255, 0) will turn your text green, (0, 0, 255) will turn your text blue.
Step 2: Keybinding your macros
Once you have programmed your macros, you will need to assign them to specific keys so that you do not need to go through the menu every time you want to use one.
Go to “File”, “Options”, “Customize Ribbon”, and then click the “Customize…” button next to “Keyboard Shortcuts” under the left-side menu.
In the “Keyboard Shortcuts” menu, scroll down to the bottom on the left-side menu and select “Macros”. Then, scroll down the right-side menu to find the macros you have programmed earlier (if you made sure that their name started with a “Z” you should find them all at the bottom of the list).
Select the macro you want to keybind, click in the “Press new shortcut key:” box, and enter the combination of keys you want to associate with that macro. I decided to assign all of my macros to a combination of CTRL+ALT+ any letter on the left side of the keyboard, so that they could be pressed with one hand easily. Remember, this is all about optimization!

How to customize your macros’ keyboard shortcuts.
Once you are done, you should have all of your macros at your fingertips and be ready to start correcting essays and papers more quickly and efficiently!
