Tips and Tools to Streamline Audio Production for Teaching Purposes
If you are looking to record, edit and mix audio files for teaching purposes, homework assignments or presentations, it is easy to find a myriad of free or cheap tools – as well as expensive equipment – on the Internet. APOP offers hands-on workshops to familiarize education professionals with such audio production tools, but users first need to understand the whole process itself, as well as the prerequisites to complete it:
- Plan your production
- Record the necessary material
- Edit and mix
- Finalize and save your work
Planning Your Production
Write a complete list of the material you need to produce before even pressing the red button. It is paramount to start by preparing the different texts you want to record. It will allow you to schedule your recording session more effectively. Identify the keywords that will be more difficult to pronounce, organize the different sections and do a practice run (or a few!). Also, gather all external elements – audio segments from another source, such as excerpts from the radio for instance – that are going to be used in the editing and mixing phases. Make sure that:
- Those files are ready to be added to your project
- The wanted segments are identified and edited
- The volume and quality are appropriate
Volume and quality can be defined by the sound of the files; is it clean or noisy, is it loud enough compared to the rest? By giving careful attention to this first step, you will save precious time and allow the whole process to be satisfying.
Recording Gear, Environment and Other Considerations
First, find a quiet place. This doesn’t necessarily have to be a professional recording booth; it could be your office when it’s calm, or at home when the family’s out. Set up your recording environment as well as the devices that you’ll be using. It is possible to execute these tasks with the help of cost-effective peripherals, such as USB microphones and a laptop or desktop computer. Of course, for teaching purposes, your laptop’s built-in microphone, for instance, will do the trick. The main idea here is to be independent during the recording process, without having to build a home studio with all the paraphernalia. You can easily auto-produce your material so that you save time and energy, with few resources and simple procedures.
In a quiet environment, you’ll be more likely to end up with good quality recordings without having to make a lot of modifications afterwards. Recording in a wardrobe will give you a sound that’s comparable to the one you’ll get in a professional recording booth – as awkward as it sounds. With a good editing software program such as Audacity and a little bit of familiarization, you’ll be able to create great pieces of audio that will allow you to reach your goals.
Even in a pedagogical context, it is inevitable to follow certain rules of thumb for producing well-sounding material. In the recording phase, make sure your signal doesn’t exceed a certain limit. Most of the programs you’ll work with will display your input signal on a color-coded meter – green is generally good, orange is the sweet spot and red is too much. This all may sound very technical, but these are the basics for recording material that will compete with professional productions out there on the market. Also, avoid distracting noise such as rustling of papers. Try putting your sheets on a stand or simply keep them on the desk. Having a digital version is also a good idea.
Your students might not judge you on the quality of your recordings, but this will draw their attention more effectively to the content and what they can get out of using it. If the material is well structured and clear, no doubt you’ll keep them listening and working for a while.
Editing to Achieve a Clean Result
Once you have completed recording and importing the different audio files that will make up your final project, you need to edit the different sections so that the appropriate pace is set. You will want the different sentences, paragraphs or sections to flow in a clear and structured way. This can be achieved by:
- Making cuts
- Gluing things together
- Adding crossfades between clips or segments
Every audio mixing software program will allow you to complete these tasks either by clicking and dragging elements on the timeline, or by choosing the appropriate action from a menu. Look out for a cutting tool, scissors, fading in/out and crossfade options.
When joining 2 clips together, there is a crucial need to smooth out the edges so that no “clicks”, “pops” or any other distracting noise will be left on the track. At the end of the day, you want to do things correctly, especially if you are modifying the original files (destructive method). When working this way, the audio will be permanently modified.
The first image below shows a selection that is very imprecise and sloppy. This will result in an audio segment that’s not complete, with unwanted noises both at the beginning and the end. The second image shows the result of an edit that leaves enough space (or silence) for the whole audio segment to be heard without being cut off in the middle of a word. It will also be easier to blend in with another segment. Zooming in will help you edit properly.
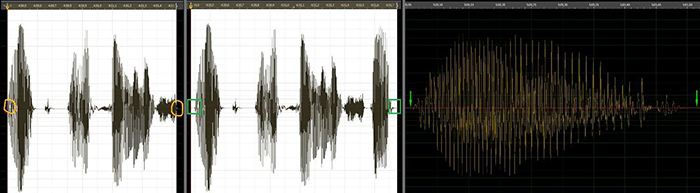
Waveforms give the user a visual reference to ensure a crisp and clean result when editing.
You can also insert silence if necessary. In English pronunciation labs, for instance, teachers at Cégep Limoilou allow their students time to answer by leaving silent segments between each item. Look for a command such as ‘insert silence’ or simply move your audio segments on the timeline to keep such separations in your work.
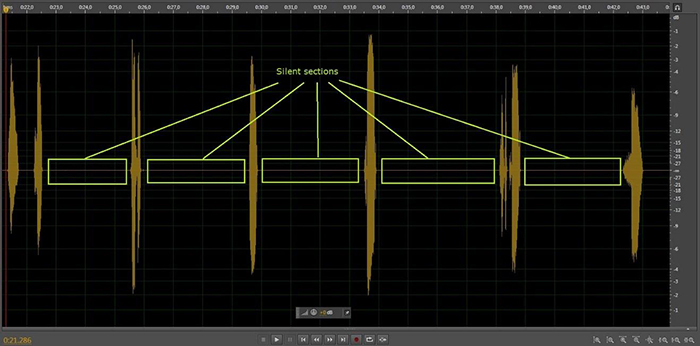
Inserting silence allows students time to respond while avoiding background noise generated at the recording phase.
Finalizing and Saving Your Work
Once you have completed the arrangement of all your recordings, you are ready to finalize your work and share it with your students. To obtain a professional result, aim for a proper overall volume; look for a ‘normalization’ command, or a limiter. This will allow raising the global loudness of your material without generating distortion.
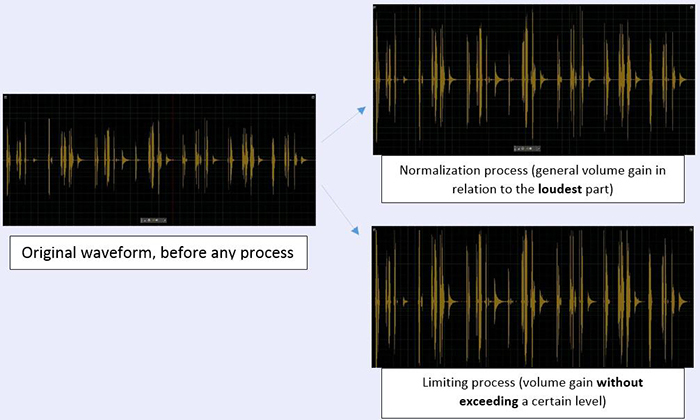
Waveform normalization (general volume gain in relation to the loudest part) and limiting (volume gain without exceeding threshold) examples.
Finally, you will need to save your file as a compatible and light format. Most programs will easily let you do this; look for ‘export’, ‘bounce’ or ‘mixdown’ buttons or commands. ‘Save’ will more often refer to saving the project, the workspace. Ideally, you want your file to end up as an MP3, a common type of audio format that’ll work on most players. Sharing it will also be easier, as your file will be small enough to be accepted on various pedagogical or other types of platforms.
