Digital Tools to Support an Inclusive Pedagogical Practice
 This Featured Report is licensed under a Creative Commons Attribution – Non Commercial – Share Alike 4.0 International License.
Digital tools are now an integral part of the college teaching landscape. They are great allies to reduce barriers to learning and provide new opportunities for accessibility in the classroom and beyond.
This featured report aims to explore the features and possible uses of certain digital tools that can help make learning accessible to all students and support their autonomy as part of an inclusive pedagogical practice. Following the principles of Universal Design for Learning (UDL), the tools presented, which are free or are already part of college teachers’ technological environment, offer additional options to students as to how they can represent information; act and express themselves; and engage in their learning.
Throughout this featured report, we hope to introduce you to new possibilities and innovative ways to use a selection of common digital tools to support an inclusive approach. We invite you to contribute to this report by sharing your practices and ideas in the Comments section.
Table of contents
Concepts
The selection of digital tools in this featured report is based on the principles of Universal Design for Learning (UDL). This inclusive pedagogy model, which shares many commonalities with the principles of universal design for instruction, is based on course planning that anticipates barriers to learning, taking into account the diverse needs of students.
Rather, it suggests that educational activities can be designed to provide all students with the opportunity to develop their autonomy and full potential, whether or not they have a disability or a learning disability.
Digital Tools and UDL: Why?
UDL does not absolutely require the use of technology. Their “natural association” is explained by the fact that technology offers new opportunities to support learning before, during and after class.
Digital tools have several advantages to support an inclusive pedagogical approach:
- Offer better accessibility to knowledge, for example by depositing content on an online course platform or consulting additional multimedia resources. Students have access from anywhere, at a time that suits them.
- Vary teaching strategies, a recognized practice for engaging and reaching out to more learners.
- Take into account the diversity of students and their needs: need to read, view, hear, schematize … digital tools offer several ways to represent information, to adapt the pace of learning, acting and communicating, which supports the achievement of learning objectives for all students.
- Increase the frequency and quality of feedback, including providing personalized and detailed feedback other than handwriting. Interactive survey tools and online formative questionnaires are other options to explore to support learning.
- Expand the classroom. Digital technology makes it possible to continue learning and collaborating beyond class time. Students can rely on different means of distance communication, with the teacher or between them. For example, actively participating in online discussions can foster the emergence of a peer community.
- Support students’ autonomy and enable them to develop their full potential. Digital tools provide additional options for students to demonstrate the acquisition of skills or knowledge. By offering them choices about the support or the mode of communication by which they can present their acquired skills, all students have a fair chance to showcase themselves.
How to Select an Appropriate Digital Tool?
Before introducing a new digital tool into an educational activity, it is important to ask questions about its relevance and the benefits that students will derive from a UDL perspective. The approach we propose aims to equip you to make choices according to your objectives and the needs of your students.
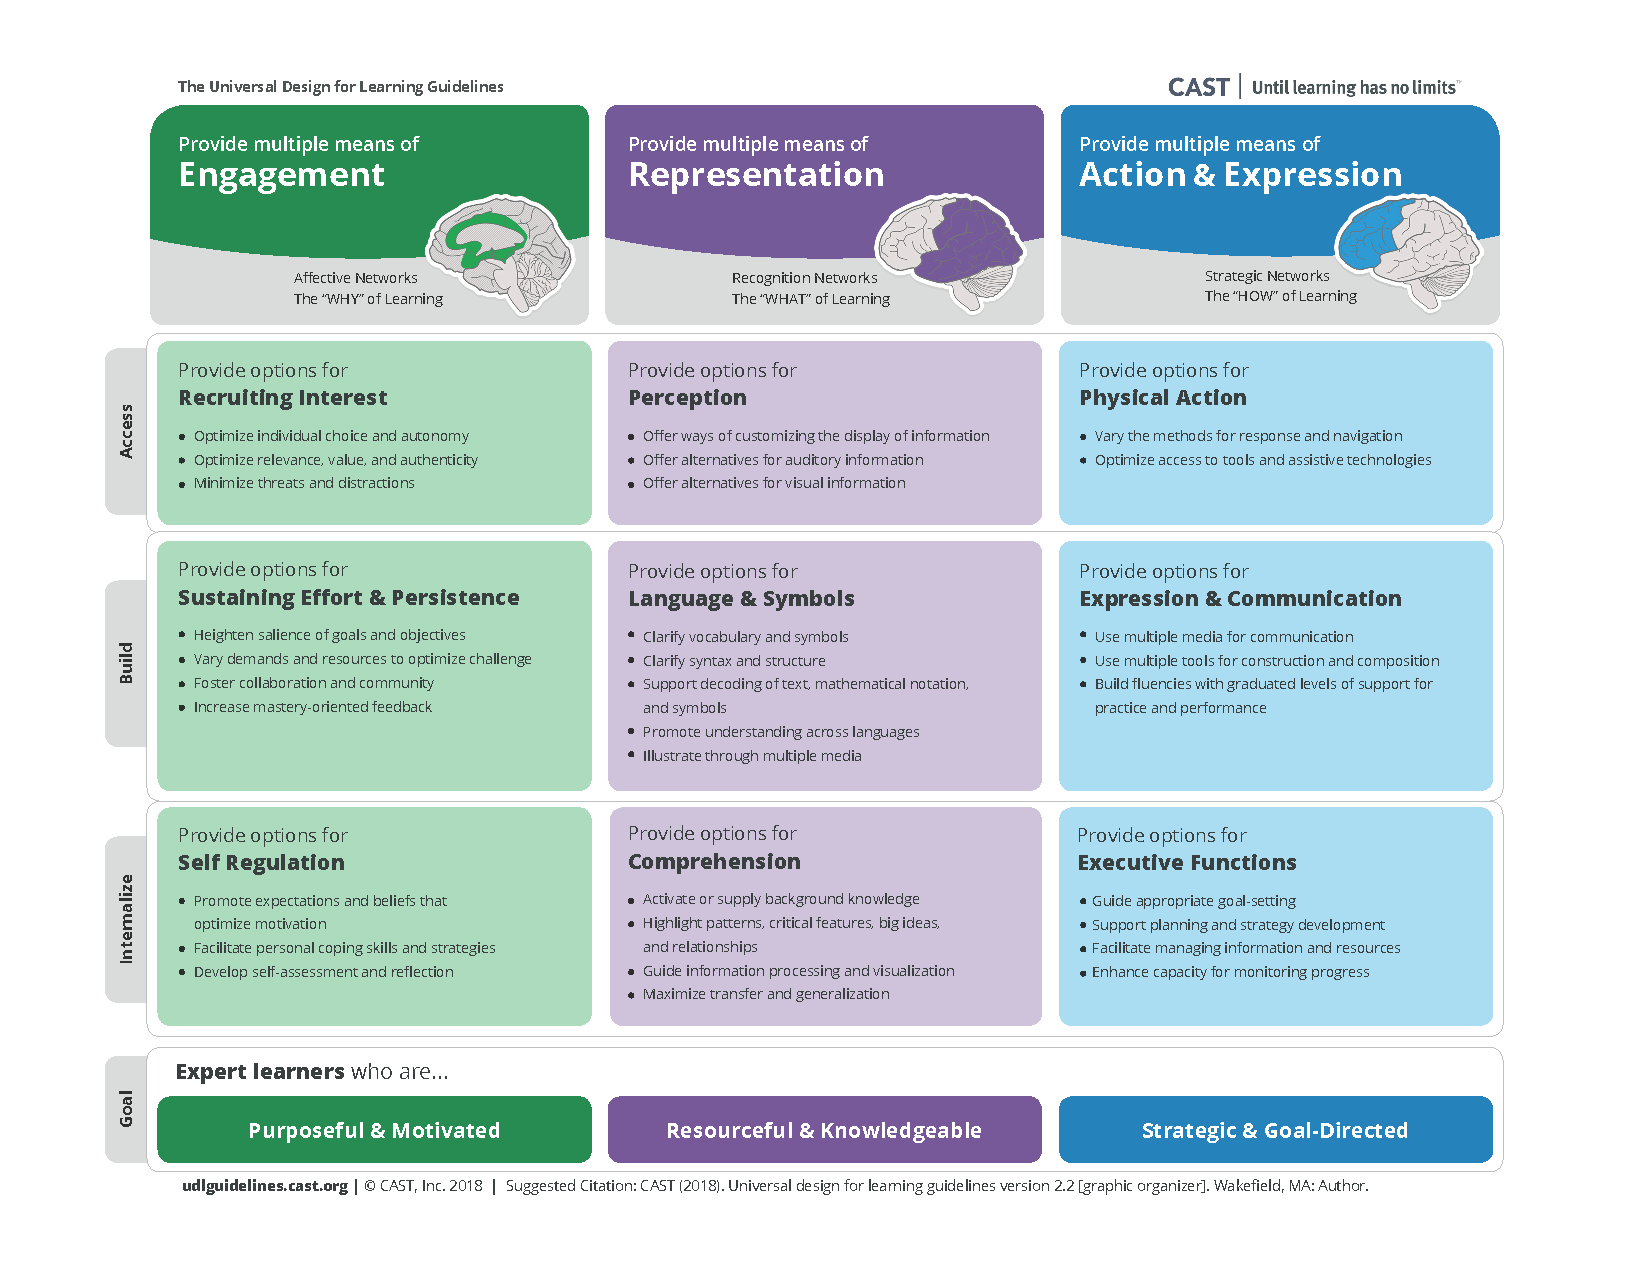
Our approach is based on the CAST reference table (Center for Applied Special Technology). This table presents the UDL guidelines, gathered under 3 principles.
The guidelines contain suggestions for actions or educational strategies that can be implemented to support UDL. They also provide food for thought to assess which aspects of UDL can be supported by introducing a new digital tool into your teaching and learning activities.
If you are unfamiliar with the CAST reference table, we recommend that you consult the section “How to interpret the CAST reference table?“. This is an integral part of the proposed thinking process.
To support and guide your reflection, we suggest you use the following document, which can be downloaded or printed. It contains:
- The most recent version of the CAST reference table
- A “light” version of the same table, which takes in the form of boxes to fill
Proposed 3-Step Approach
- Using the guidelines from the CAST chart, identify an aspect of your course that you would like to make more inclusive. This reflection can focus on different aspects of the students’ learning experience: digital environment, course material, assessment methods, communication, engagement, etc. Are there any recurring barriers or difficulties related to aspects of your course? What aspect of the learning experience would you like to improve?
- Depending on the target identified (is it an action you need to take, additional choices you want to offer to students?), we invite you to think about ways in which you could achieve your goal. The solution can be technological or not. If it is, the “Pedagogical Practices” section of this report may inspire you as to the methods or digital tools that can support your approach.
- After selecting a potential digital tool, we suggest that you validate this choice by associating the tool with one or more of the UDL guidelines. The table to be completed provides support for reflection. By placing the tool in one or more boxes in the table, you can more easily identify which aspects of the UDL can be supported by its use. You could even discover possibilities that you had not initially considered (and improve your approach).
We propose the same exercise in this report. At the end of each section on a category of tools, you will be able to view the simplified CAST table in which we associated the suggested digital tools with the UDL guidelines. Other associations are possible, depending on the needs of your students and the digital practices you consider.
How to interpret the CAST reference table for UDL?
This section presents the different components of the CAST reference table and explains how to interpret it (vertical and horizontal reading). If you are familiar with this reference tool, go to the next section: “Pedagogical Practices“.
The CAST reference table provides a detailed description of the principles and guidelines of UDL. At first glance, the amount of information it contains can be overwhelming. However, it is a useful support for pedagogical reflection, in particular to guide the choice of teachers in terms of appropriate digital tools and their added value in a context of inclusive pedagogy.
To better understand how to interpret this table, let’s deconstruct it in a few steps.
The 3 principles of UDL

The conceptual UDL framework is based on research on the neurological processes of learning, which identifies 3 brain areas solicited in the learning process:
- The affective network (the why of learning), linked to motivation
- The recognition network (the what of learning), related to the processing and storage of information
- The strategic network (the how of learning), related to planning and execution of tasks
In the header of the CAST reference table, these neurological processes are associated with the 3 principles guiding UDL:
- Offer multiple means of engagement, to capture and maintain student interest and motivation.
- Offer multiple means of representation, since students assimilate and process information differently.
- Offer multiple means of action and expression, so that students develop learning strategies that suit them and benefit from flexibility in demonstrating their learning or skills.
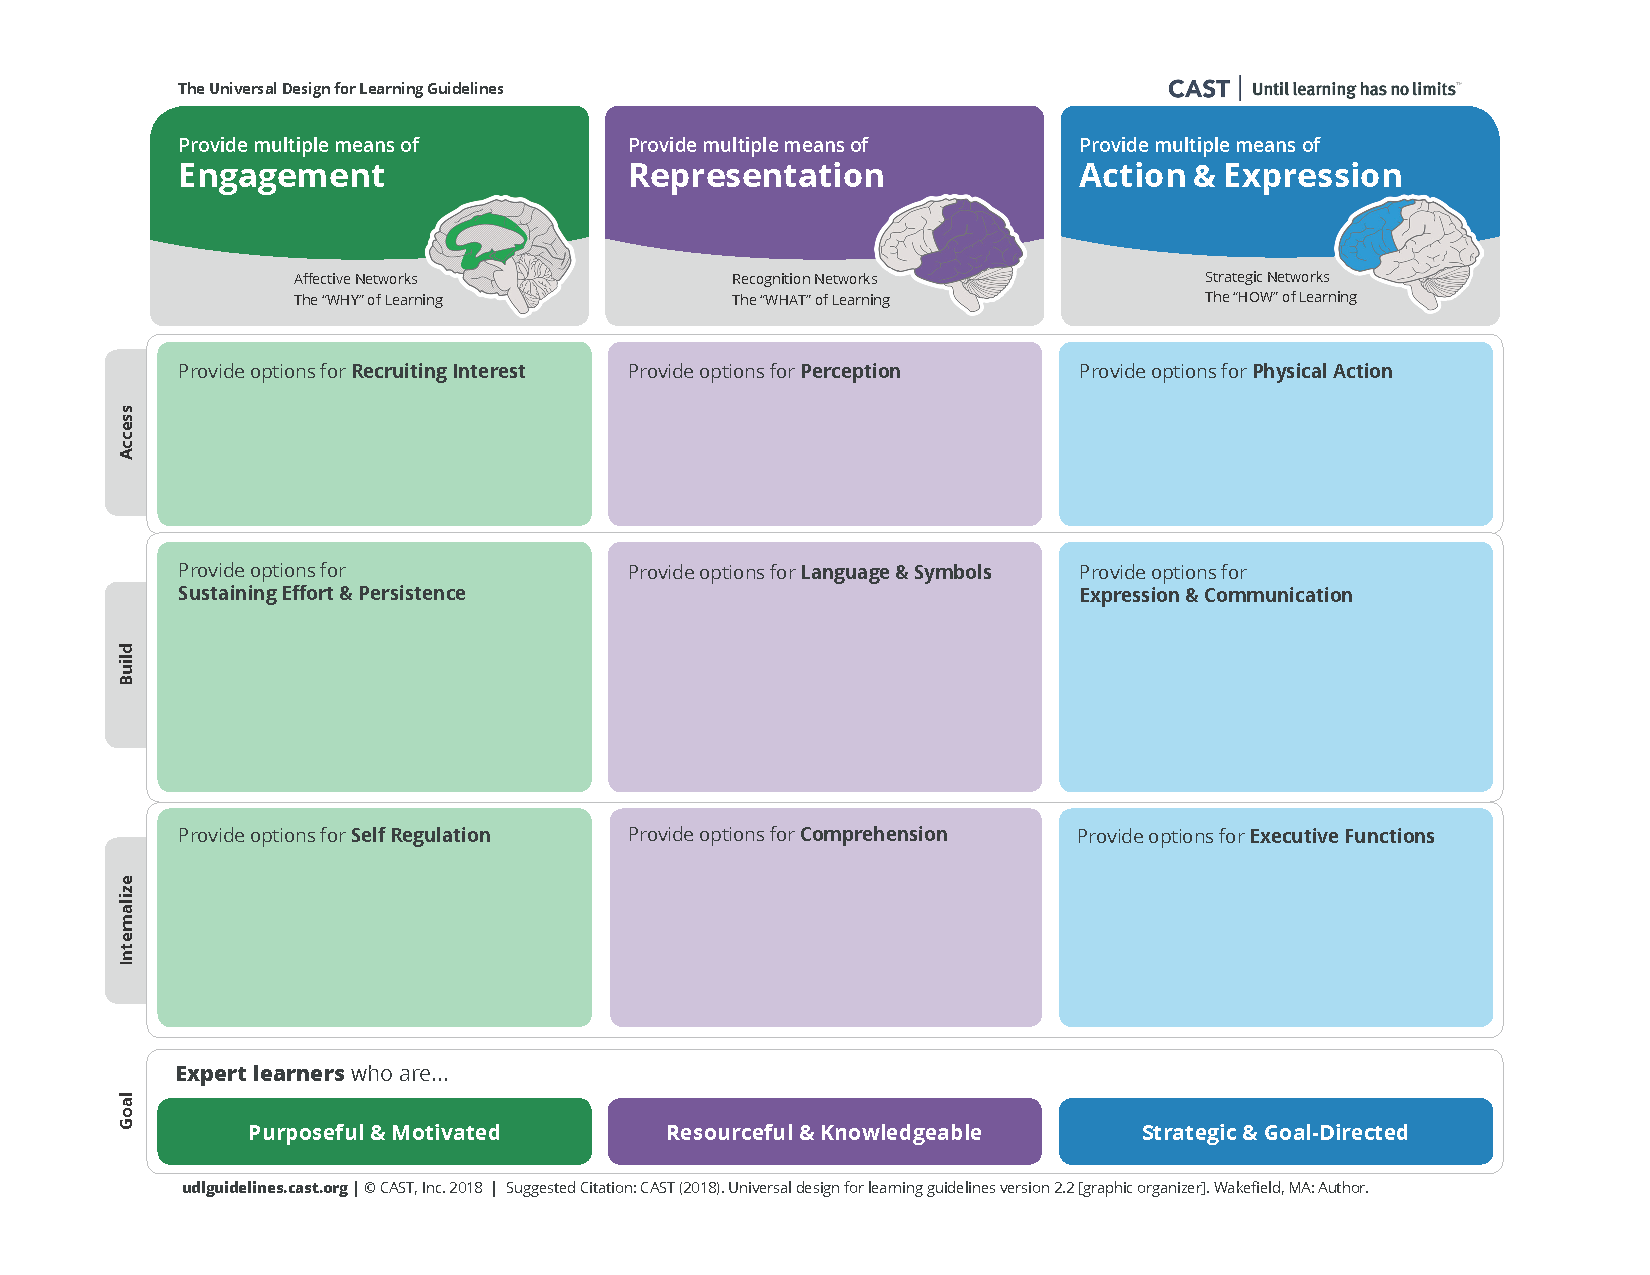
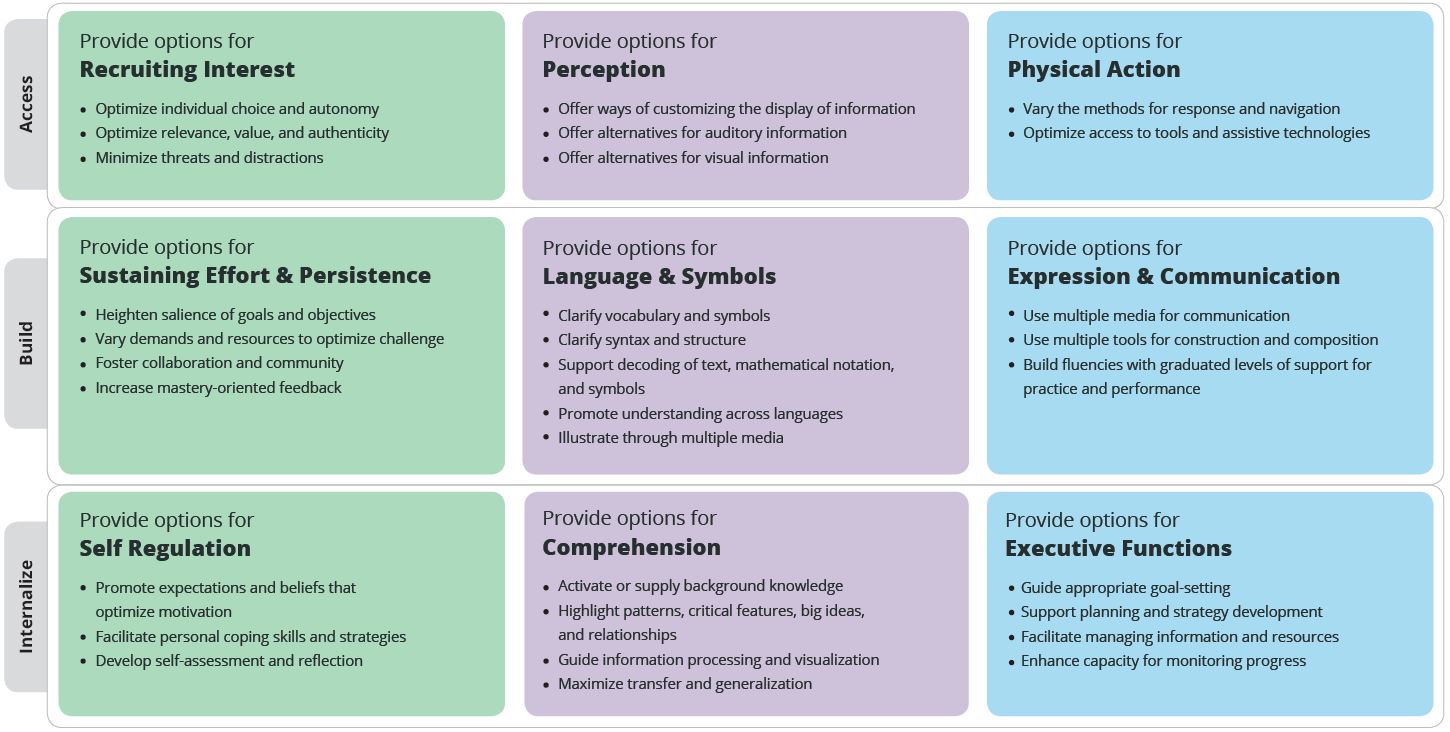
These 3 principles correspond to the 3 vertical columns of the table. Each column includes examples of actions (called guidelines) to implement the principles of UDL.
“The UDL Guidelines are not meant to be a “prescription” but a set of suggestions that can be applied to reduce barriers and maximize learning opportunities for all learners. They can be mixed and matched according to specific learning goals and can be applied to particular content areas and contexts.”
The 9 UDL Guidelines
 The CAST guidelines provide suggestions for action to support UDL.
Have you noticed that the guidelines, displayed in columns, are also divided into 3 rows? Their horizontal organization follows a progression, from the external actions (posed by the teacher) towards an internalization by the students:
- Make content and learning objectives accessible (Access)
- Develop strategies to support learning and perseverance (Build)
- Promote student autonomy (e.g., set goals, apply optimal strategies, reflect on learning) (Internalize)
The Ultimate Goals of UDL
At the bottom of the table, we find the objectives of UDL, to train “expert learners” who manage to identify and autonomously put in place the optimal learning strategies for them. UDL aims to ensure that all learners are:
- Determined and motivated
- Resourceful, informed and competent
- Focused on strategic objectives

Pedagogical Practices
This part of the report presents digital tools or features of some software programs that you can use to optimize your practices from an inclusive perspective.
The suggested tools are not specialized software (on this subject, consult the Adaptech database instead). We have retained common tools that you are likely to use (or that you already use) and that can contribute to:
- Reduce barriers to learning
- Provide additional options for students to visualize information, act and communicate, and engage in the course.
This report is not intended to provide an exhaustive inventory of digital tools. The tools presented are intended to be a source of inspiration and a starting point for the implementation of UDL. Other approaches and other tools can be used. We invite you to start your own pedagogical reflection based on the approach proposed in the section “How to Select an Appropriate Digital Tool?” to make the appropriate choices based on your goals and the needs of your students.
1. Digital tools for content presentation
Word processing software and digital slideshows are widely used as presentation materials by both teachers and students (written work, oral communications, etc.). Since working with these tools is often unavoidable, how can we make them more inclusive? This section proposes to explore different ways to vary the presentation of content or make it more dynamic.
Validating accessibility options (Microsoft Office)
- Check the accessibility of digital documents. Most Microsoft Office suite software programs have a feature that automatically verifies your entire document and raises potential accessibility issues (much like the software program Antidote does for text revision).
How to check accessibility in Word, PowerPoint, Excel, etc. :
- Select the “File” tab.
- Click on “Check for issues”.
- In the drop-down menu, choose “Check accessibility”.
A window will open to the right of the screen and display the list of potential problems (which you can choose to correct or not). Each detected issue is followed by an explanation and then the procedure to correct the problem.
- Use the reading aloud feature in Office 365. The immersive reader can be downloaded for free and integrated into Word or OneNote. The reader allows, among other things, to:
- Adjust reading speed, character size and interline spacing;
- Detach syllables, and focus on a limited number of lines (by obscuring previous and subsequent lines);
- Use the built-in machine translation function of the entire text or click on certain words to read their translation and hear their pronunciation in another language.
How to activate the Immersive Reader in Word and OneNote:- Select the “View” tab.
- Click “Immersive Reader” to enable the reading aloud function.
- The sound settings are accessible at the bottom of the screen.
- The display and translation settings are accessible in the top right corner of the screen.
Vary the Visual Presentation of Content
- Record a video capture of important course documents. The course plan, for example, is often provided in Word, PDF or paper format. An alternative is to record a video capture (screencast) that includes the explanations given in the first class, but which students can forget during the semester. This method can also be used to explain an assignment or an evaluation grid. By depositing or sharing the video on a learning management system used for the course, students can, if necessary, listen again to the contextualized explanations of the teacher.
Suggested tools:
- Screencast-O-Matic (the free version allows you to record segments of up to 15 minutes each)
- OBS Studio (open-source software)
- CamStudio (open-source software)
- Camtasia (available in some colleges; 30-day free trial)
Video capture of assignment instructions with teacher explanationsVideo captures can also be used by students to comment on an assignment or explain the resolution of a problem. A simple and accessible solution is to film their copy with their smartphone (video selfie).
Example of video recordings of students explaining mathematical problem solving [in French] (read the real-life story) - Create an animated video to present class rules, safety instructions or any useful information. An application like Powtoon makes it easy to create animated content.
A PowToon presentation of the rules in the ESL classroom of Andy Van Drom, teacher at Cégep Limoilou
- Use graphic organizers to create concept maps or mind maps. Several free tools (or their free version) make it possible to create concept networks, often in a collaborative manner, which can be a way for students to represent the links between objects, notions or events. Students could also film their maps with their phones by commenting on them to present the information to their peers or the teacher.
Suggested tools:
- Cmap
- Mindmeister
- Coggle (online platform to collaboratively produce mind maps)
Infographics [article in French] are another way of organizing the visual presentation of information, including for students, when presenting an assignment. Some online applications, such as Thinglink, allow you to embed interactive content (text, video, sound, image or hyperlink) directly in an illustration.
 a href=”https://www.thinglink.com/”>Thinglink allows you to add interactive elements in an image, identifiable by means of icons. Visualize the original image to discover its interactive features. (Source)
Suggested tools:
- Canva (creation of infographics of all kinds, possibility to upload your own images, selection of images and free icons)
- Piktochart (create and edit infographics from images and free icons)
- Discover other tools for graphic organization or visual presentation [in French].
Make Digital Slideshows More Dynamic
Some base rules can guide the visual development of a digital slideshow to make it effective. It is also possible to add interactive or audiovisual elements to keep the students’ attention, involve them or guide them when they consult the slide show before a class or when they use it to review.
- Interactivity during the presentation. Some plugins or web platforms allow you to add interactive elements to your PowerPoint or Google Slides presentations:
- Polls and surveys
- Questions asked by students
- External content (hyperlinks, videos)
- Feedback from students
Suggested tools:
- Hypersay (online platform that allows you to display your presentation on the screen of your students’ devices, using an access code)
- Wooclap (online platform that offers similar features, but also allows students to rate their appreciation of the content or identify items on an image. Limit of 30 participants for the free version).
- Audio and video recording functions in PowerPoint. Especially useful when the slideshow is placed on an online course platform and you want to include some of the explanations given to the students in class. It is possible to:
- comment on a single slide (adding an audio recording signalled by a speaker icon)
- to record a screencast (with or without narration) in a slide (the video will activate on this slide only)
- to record a complete narration for the whole slide show
Audio and video recording functions in Powerpoint
Constructing an Online Portfolio
The digital portfolio is an option for the presentation of student content that offers many benefits from a UDL perspective:
- The portfolio is built gradually, which may be more representative of the progression of learning.
- In their portfolio, the student collects a set of elements that reflect the learning and skills acquired. They could also choose the content submitted for evaluation (e.g., their best work, a number of predetermined tasks from which the student chooses those submitted from one week to the next, etc.).
- The student can submit personal reflections (reflective and self-evaluation skills) and get feedback from the teacher to guide him or her towards the achievement of the learning objectives.
Suggested tools:
- Private WordPress sites hosted on Profweb’s Web Space
- The wiki function in Moodle [in French]
- Consult the Profweb featured report on the e-portfolio for even more examples of tools and their potential uses.
 Digital tools for the presentation of content, aligned with UDL principles.
2. Digital Tools for Audio/Video Communication
Audio and video communication offer other means by which the student can represent information and demonstrate his or her achievements (other than in writing, for example). They also provide additional opportunities to support engagement and collaboration with peers.
Audio Files
Podcasting may be an option to consider for varying ways of presenting and communicating information. Students can also turn to this format to present a personal reflection in a log, a research assignment or an oral communication [in French].
Suggested tools:
- Basic dictation application on smartphones
- Audacity (free, open-source software for recording and editing audio files)
- Voice Recorder (free mobile application for Android, allows you to classify recordings in customizable folders)
Video-Based Communication
- Video as a means of communication with the teacher. This format can be offered in addition to office hours. It facilitates improvised meetings, for example to offer detailed explanations more effectively than by email.
Suggested tools:
- BigBlueButton (free, open-source software that integrates into Moodle)
- Skype (works with the same ID as Office 365)
- Slack (allows the creation of threaded chat channels to communicate, which can replace email or MIO exchanges)
- Google Hangouts (requires a Google Account)
- Zoom (allows video conference recording)
- Whereby (allows you to create a personalized hyperlink to the virtual meeting room; students only have to use this link to access the video conference)
- Video as a means of discussion between students. Flipgrid is an online forum for video discussions. Students can answer an initial question from the teacher and respond to others by recording short videos from their phone or laptop. Beyond the course-related discussion topics, Flipgrid can also be used to create student-driven FAQs, allowing everyone to listen to questions from peers and teacher responses.
- Video as a support for the evaluation (formative or summative) of students. Video may be an option offered to students to present the results of an assignment or a personal log, in a course or internship. It may also be a modality that differs from the traditional oral presentation in front of the class.
Student-created video: a smoothie recipe in Spanish! (read the real-life story)
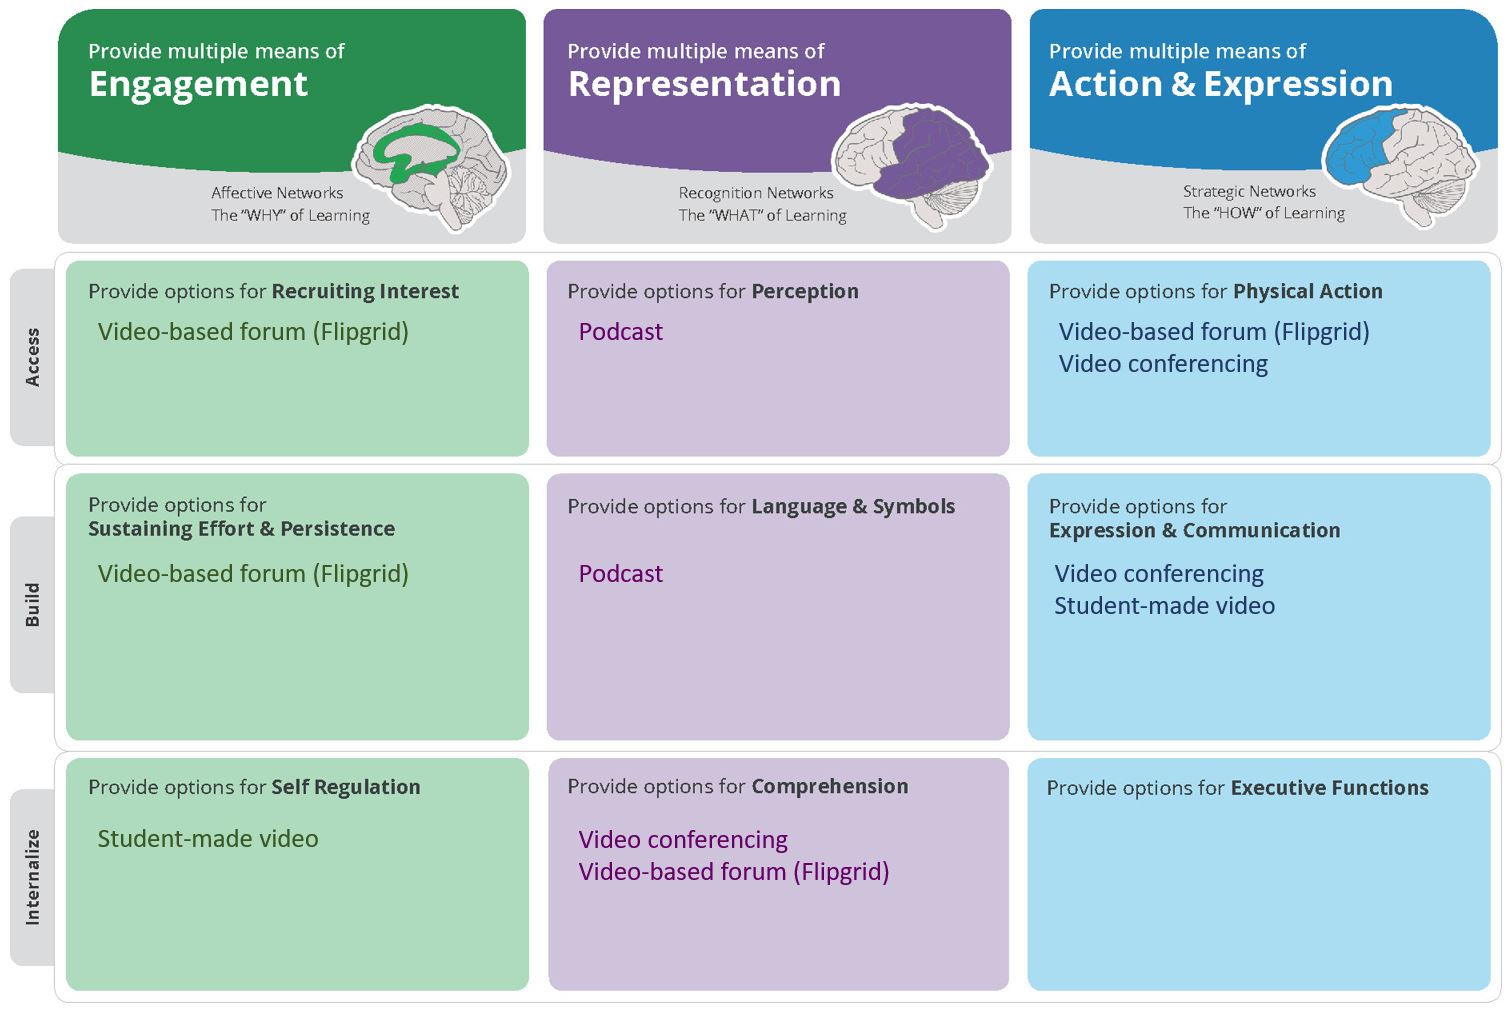 Digital tools for audio/video communication, aligned with UDL principles.
3. Digital Tools for Feedback
Frequent feedback is one of the factors contributing to academic success. In a UDL context, this feedback can be part of a desire to vary the modes of communication and personalize feedback given to the student. Several UDL guidelines can be exploited through formative feedback:
- Students receives scaffolded support to develop their skills.
- Feedback helps guide the students toward learning objectives.
- Feedback gives the students the opportunity to monitor their progress.
Written Feedback
As corrections accumulate and time flies, it may be tempting to reduce feedback to succinct correction marks. The keyboard shortcut feature, which allows you to write a detailed comment and automatically insert it into a text with a replacement code, can be a great help. Among its advantages:
- You avoid continually typing the same comments.
- The process is faster than copying and pasting text from a comment stored in another document.
- Students benefit from rich and complete feedback without having to sacrifice the efficiency of the correction.
Example of a substitution code in Google Docs to provide a detailed explanation. The “Suggestion” mode makes it possible to clearly distinguish the feedback from the rest of the text.Suggested tools (links to procedures):
Audio Feedback
Audio feedback is a way to personalize student assessment and offer more detailed explanations of your correction and marks, highlighting what the student is doing well and what he or she could do better. Students can listen to the recording with their copy in hand.
An example of audio feedback [in French] by Karine Bélair (read the real-life story)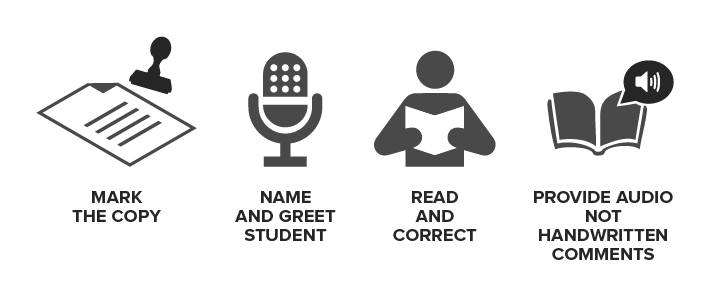 The key components of audio feedback according to Jean-François Legault (read the real-life story).
Suggested tools:
- Audacity (free, open-source software for recording and editing audio files)
- Talk&Comment (Chrome plugin)
- Vocaroo (Online voice recorder that automatically generates a single sharing link for each audio comment file. Preferably use the Firefox browser.) .
Video Feedback
The video format is another option to consider. It may consist of filming the student’s paper copy while you correct or comment on it. Feedback can also be provided by videoconference, either through a software program offered in your technological environment or through an online video conferencing platform. Many of them do not require the student to create an account: you can just provide a hyperlink.
Some video conferencing tools allow you to share your screen and record the session. The student can listen to your feedback later, while also benefiting from it “in real time”.
Suggested tools:
- Zoom (screen sharing and recording features included in the free version)
- Whereby (screen sharing included in the free version)
Student Feedback
Course feedback may also be provided by students. As part of the learning analytics trend, digital tools are gradually developing to collect information from students about their perception of a course and their needs. Teachers can then tailor their interventions based on feedback.
Suggested tools:
- Fovéa (online platform developed in Quebec [in French])
- Netquiz Web (online platform for the creation of questionnaires [in French], available for free from the CCDMD)
- Google Forms (allows more flexibility for the phrasing of questions, but does not offer analysis or interpretation of answers)
 Digital tools for feedback, aligned with UDL principles.
4. Interactive Polling Tools
There may be different reasons for using interactive surveys and televoters in an educational activity. Many of them may correspond to UDL guidelines:
- Make an activity more fun and engaging, which can have a positive impact on motivation.
- Activate prior knowledge at the beginning of a class, to adjust your teaching to the needs of the group.
- Validate real-time understanding and provide additional explanations as needed.
- Encourage all students to participate, since polls can be anonymous.
- Review before an exam, allowing students to self-assess. Surveys can be done in a collaborative manner (e.g., students submit one question per team) to foster a peer support environment.
Suggested tools:
- Kahoot (live only; students go to the site and type a 4-digit code to access the quiz; more playful theme; from 2 to 4 answer choices)
- Socrative (allows to conduct polls of different types, in real-time or differentiated, guided by the teacher or the pace of individual student progress)
- Mentimeter (functions similar to Socrative; limited number of questions in the free version; integrates into Powerpoint)
- PollEverywhere (functions similar to Socrative; free version limited to groups of maximum 40 students)
- Factile (for a Jeopardy!-style review game)
A “Technologically Accessible” Alternative
Most interactive polling tools require students to use a mobile device. One way to make the quiz accessible to all is to ensure that the technological component is provided by the teacher. The Plickers application works with printed cards containing 4-sided symbols. To answer the survey projected on the big screen, the students hold their card by orienting it according to their choice of answer. The teacher then scans the room with the camera on their phone or tablet. Plickers recognizes the symbols and compiles all the answers in a table that will be displayed on the screen.
 Plickers cards can be downloaded and printed for free. (Press image provided by Plickers)
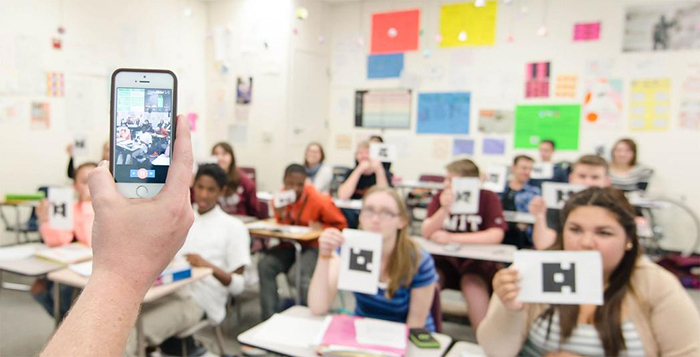 The teacher sweeps the classroom with the camera of their cell phone to process the students’ answers. (Press image provided by Plickers)
Adding Interactive Elements to Videos
To foster active listening and validate students’ understanding at different times while watching a video, it is possible to add interactive elements to teacher-generated videos or those found online on platforms such as YouTube:
- automatic feedback questions
- audio comments
- additional resources (hyperlink, PDF document)
Some tools can be set up so students must answer the question in order to continue watching. Teachers can consult statistics related to student viewing or results (and allow them to adjust explanations for the next class or to offer more follow-up to some students).
Students can also use interactive video tools to offer feedback on videos produced by their peers, ask questions while viewing, and respond in a chat channel within the video.
Suggested tools:
- Edpuzzle (create lessons from a video with audio commentary, hyperlinks, and questions)
- VideoAnt (add annotations, comments, and questions to any publicly accessible video online)
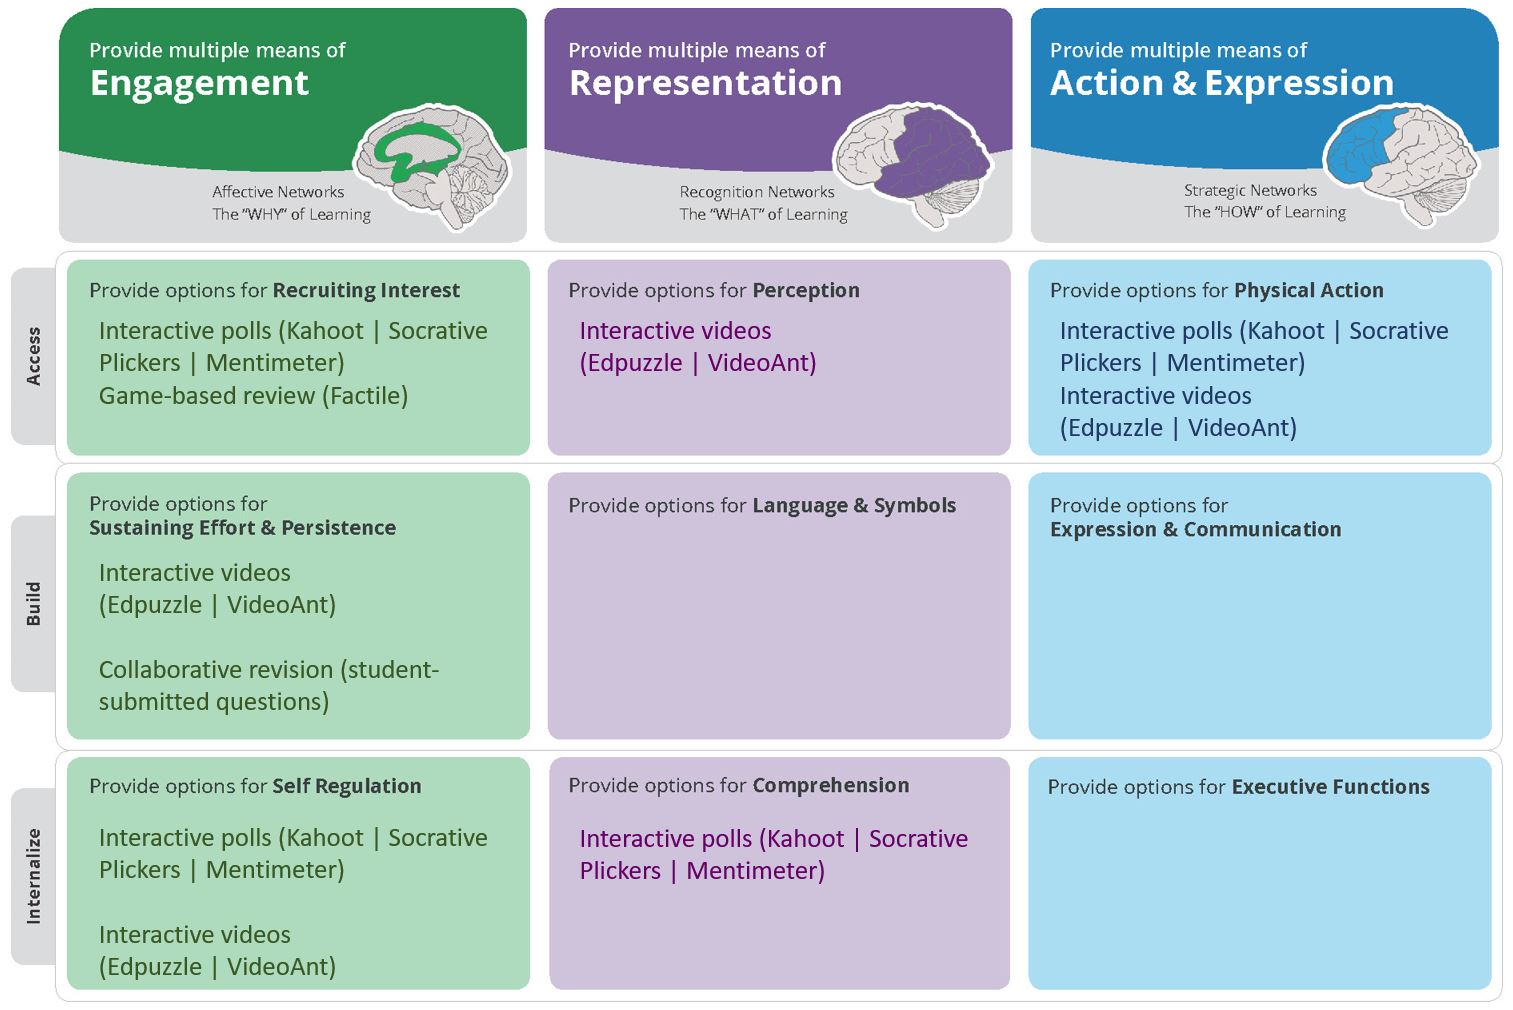 Digital interactive polling tools, aligned with UDL principles.
5. Collaborative Tools
One of the guidelines of UDL is to foster collaboration and community to support student effort and perseverance. This section presents some tools for digital collaboration.
Collaborative Functions in the Cloud
Thanks to cloud computing, students can work within a single document that is updated in real time. This facilitates collaboration and promotes team spirit, particularly in an approach that integrates peer learning and feedback.
- The “Comments” function allows students to ask their questions easily and to indicate the tasks to be completed (e.g., complete or revise a section).
- The “Suggestions” function and history of changes make it easy for all collaborators to follow the evolution of a document. The teacher can observe the progress of the work done and identify the actions taken by each student.
These features can also be used for collaborative note taking, which all students can benefit from later on.
 An example of collaborative work in the same document, in a peer learning approach (read the real-life story)
Suggested tools:
- OneNote and the Class Notebook on Office 365
- Microsoft Teams on Office 365
- Google for Education tools
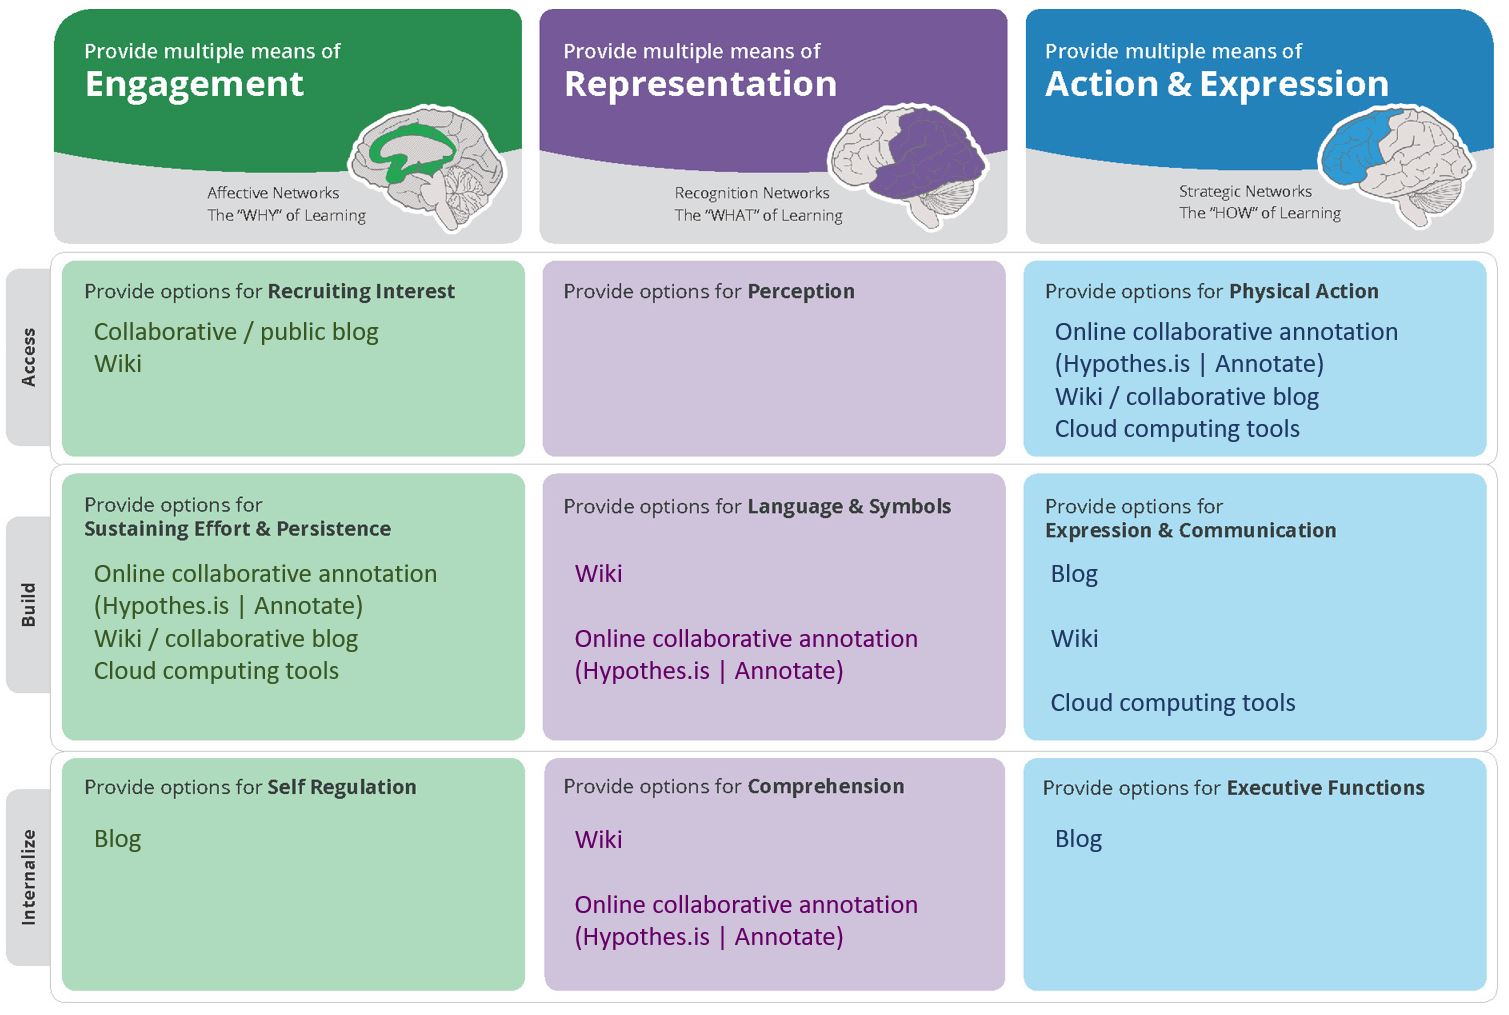
Wiki or Collaborative Blog
Another way to support students’ perseverance is to foster meaningful and authentic types of collaboration, which can have a positive impact on motivation and learning.
- A class wiki, to which all students contribute during a course or from one session to another, can be used to create a glossary of terminology [in French] or introduce them to research and an encyclopedic writing style. The wiki promotes co-construction of knowledge and peer feedback.
- A blog on WordPress can be used to keep a log for a course or internship [in French]. The blog can also help to reinforce the cohesion of a group scattered geographically during internships. A public blog, open to comments from peers or internship professionals, makes the writing exercise even more meaningful for students.
Suggested tools:
- Web Spaces on Profweb (creation of educational sites, blogs and collaborative wikis at no cost for college teachers)
- Wikipedia (open source encyclopedia [in French])
- Edublogs (blog features specifically tailored to an educational context)
- linkr (platform where students can publish their texts and react to those of others)
Collaborative Annotation of Online Content
While fostering collaboration, collaborative annotation tools allow students to process content in a variety of ways, differentiating opportunities for understanding. They facilitate the co-construction of knowledge and relationships between the concepts discussed. They also increase feedback to develop greater mastery and greater reflective capacity, especially in the context of teamwork.
For example, in addition to information in a text or video, annotation tools give students the opportunity to share their comments and questions with their peers by integrating them into the resource accessed (web page, PDF document, video, etc.)
Suggested tools:
- VideoAnt (notes synchronized to video content)
- Hypothes.is (collaborative note taking in a web page)
- Annotate (collaborative note taking in a PDF or other text document)
 Digital collaborative tools, aligned with UDL principles.
6. Tools for the Organisation of Teamwork
Teamwork sometimes poses challenges in terms of the fair distribution of tasks and the reconciliation of schedules. Several digital tools facilitate the organisation of teamwork, including allowing students to plan and track the progress of tasks through an online application or platform. These tools offer several advantages from a UDL perspective:
- They help students develop their autonomy through increased accountability.
- They facilitate the management of information and resources mobilized by bringing them together in one place.
- They allow to quickly visualize the contents, tasks and the deadlines of a project for better time management.
- They allow the student to improve his or her ability to monitor progress.
Visual Organisation of Information and Tasks
Online project management platforms do not usually require creating an account, since you can connect to them with a Google or Office 365 account. Shared spaces can be set up to make access public or restrict private access to certain participants, depending on the context and the needs of the students.
These platforms make it possible to:
- Centralize communications in conversation channels corresponding to a particular task, which avoids the multiplication of emails.
- Divide tasks among team members. It is also possible to create individual or team task lists.
- Visualize the progress of the tasks of all the team members.
- Share different types of media (text, image, video, etc.) gathered during research and facilitate their identification.
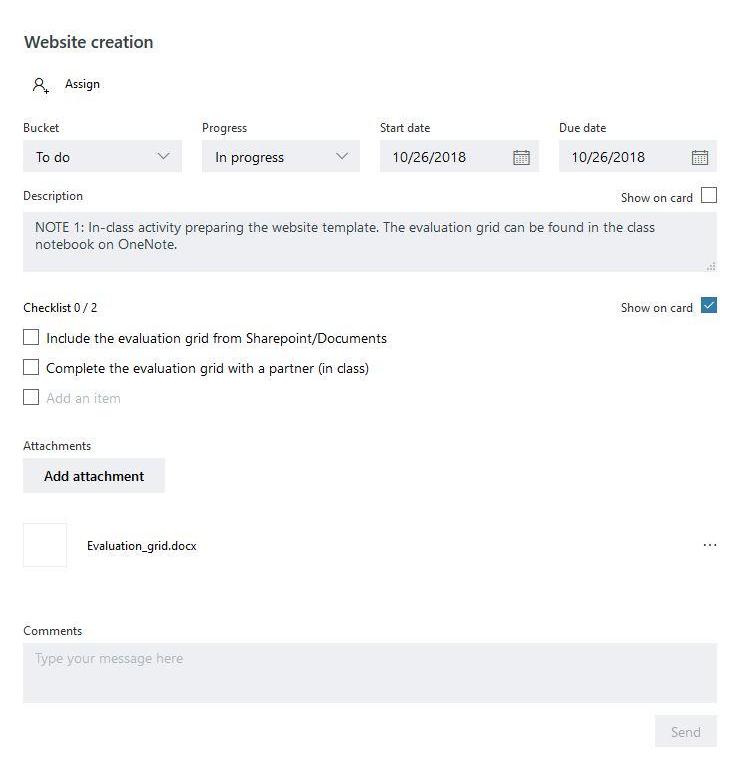 An example of a task created in Planner (Office 365). It is possible to assign the task to a person, to specify its progress, its deadline and to comment on it. (read the article on Planner)
 Calendar view of tasks on Asana. The web platform makes it possible to visualize all the tasks of the team and their deadlines. (Video source)
Another possible display style is to create a “virtual wall” on which thumbnails are pinned (these correspond to tasks, categorized content or discussion topics between team members). Collaborative walls can be used in the classroom by the teacher to engage students [in French], or by a team of students to gather information related to an assignment and facilitate task management.
 An overview of different display and organisation styles on Padlet (read the article [in French])
 Two examples of project management by student teams on Trello (read the real-life story [in French])
Suggested tools:
- Padlet (sharing content grouped in categories or discussion topics);
- Trello (allows you to visualize the tasks and documents associated with a project in the form of sticky notes arranged on a virtual board) ;
- Asana (online project management platform) ;
- Planner (Office 365) (can be used alongside OneNote and the Outlook calendar) ;
- Teams (Office 365) (can be used alongside OneNote and its class notebook).
 Digital tools for the organisation of team work, aligned with UDL principles.
Conclusion
In this report, we have presented a selection of technological tools that we consider aligned with the principles of UDL. Rather than aiming for an exhaustive overview, this report offers a starting point to inspire and equip readers who wish to develop inclusive teaching practices.
The report also proposes a thought-provoking approach that builds on the UDL guidelines to guide your future choices regarding the integration of digital tools into your pedagogical strategies. The structure of the report illustrates this suggested approach:
- Based on the CAST reference table, we have identified aspects of UDL that could benefit from the implementation of digital tools in teaching and learning.
- We have selected digital tools that are free or readily accessible in the technological environment of colleges by grouping them according to their pedagogical purpose.
- A summary table at the end of each section presents in concrete terms the UDL guidelines to which we have associated these tools and their functions in order to support an inclusive pedagogical approach.
- This reflection is of course open to many other possibilities and interpretations!
We invite you to contribute to this report by sharing your ideas and your success stories in the “Comments” section!
Thanks
The authors would like to thank the facilitators and teachers of Cégep Limoilou’s Community of Practice on Inclusive Pedagogy (COPPI), whose questions and comments during a workshop they participated in validated our approach and the tools presented in this featured report.
Useful References
Profweb publications on inclusive pedagogy
- Les applications pédagogiques de la conception universelle de l’apprentissage (CUA) : un site web de référence, article [in French] published on Profweb (2018)
- Pour une utilisation des TIC qui n’exclut personne: compte rendu d’une conférence de Paul Turcotte, article [in French] published on Profweb (2017) (the conference video is available within the article)
- Stepping Towards Inclusive Pedagogy with Screen Reader-Friendly Course Material, article published on Profweb (2017)
- ICTs: Tools for Universal Design for Instruction, featured report published on Profweb (2013)
Resources by partner organisations
- Conception universelle de l’apprentissage: la technologie, un vecteur déterminant, webinar by APOP (video recording available online [in French]).
- Pédagogie inclusive: s’approprier la conception universelle de l’apprentissage et l’intégrer dans les cours, professional development webinar by APOP [in French].
- L’inclusion au collégial, an online community of practice open to all members of the Association québécoise de pédagogie collégiale (AQPC) [in French].
- « L’intégration de la conception universelle de l’apprentissage dans les classes au collégial », an article by Marie-Noël Bêty and Violaine Gagnon published in the Pédagogie collégiale journal in the fall of 2018 [in French].
- PED-889 Pratiques pédagogiques visant la réussite du plus grand nombre (fall 2019), a course offered by Performa [in French], which aims to explore the theoretical frameworks associated with inclusive pedagogy.
UDL-related resources by other organisations
- La conception universelle de l’apprentissage – CUA, a report by the Consortium d’animation sur la persévérance et la réussite en enseignement supérieur (CAPRES) [in French]
- Les applications pédagogiques de la conception universelle de l’apprentissage, a self-paced learning website created by the Centre de recherche pour l’inclusion des personnes en situation de handicap (CRISPESH) [in French] which includes examples of good practices, pedagogical case studies and useful documents to apply UDL in the classroom or to lead a community of practice in an institution.
- UDL Guidelines, the complete reference on the UDL guidelines by the Center for Applied Special Technology (CAST).
